
Introduction
When I started my first QA role back in 2014, my first tasks included the maintenance and extension of a large test base, that was supposed to work for 4 different projects in parallel. It was based on Cucumber and the Ruby programming language, a stack I fell more and more in love with. This love still lasts to this day.
Therefore, it is time to relive the feeling, that is working with Cucumber from a fresh perspective, once more. To achieve this feeling we are going to apply an interesting little twist: We will code and test in the Rust programming language.
Rust, Ruby. 4 Letters and a capital R. Perfect!
What is Cucumber?
Cucumber is a framework, that implements Behavior Driven Development. The rules of BDD can be summarized as formulizing the requirements step by step in a more and more technical way. We start with the written requirements by your fellow business department and reformulate the requirements into a machine-readable format. Next, we use this text version to write an automated test case, that fails, and implement the feature up until the test passes. This flow gives it the popular resemblance to Test Driven Development. Cucumber leverages BDD by providing the machine- and human-readable layer based on so-called feature files. These use the Gherkin syntax, a simple syntax based on the keywords Given, When, Then, And and But.
Cucumber is still widely used as a test runner, although BDD is rarely actually implemented due to the all-time-popular time limitation in nowaday’s software projects. Another similarity to TDD, that is rather unfortunate.
What is Rust?
Rust is a fairly new and rising system level programming language, that operates in the same markets as C++ and friends. Besides system-level performance, its main focus lies in security and safety being builtin. Furthermore, due to its security and safety-heavy design architecture, it is able to completely omit automated memory management. It just doesn’t need it, while still guaranteeing memory safety.
All of these points are topped off by an exceptional developer experience: The Rust toolchain brings its full-fledged API documentation and its popular text book right to your command line-operating finger tips, and even compiler errors are designed as tiny educational lessons.
Our Test Object: A Simple AES Encryption Tool
I coded my first working Rust app, when I was learning its renowned ownership and borrow model. Usually, when it comes to the First App ™, I tend to write Fibonacci calculators in all kinds of setups: Fibonacci REST APIs, Fibonacci CLI calculators, Fibonacci FFI libs inside a Flutter app… But this time, i wanted something different. Something, that actually does stuff on a level worthy to let it be called a „system application“. So I decided to write a simple AES string encryption tool, that I gave the unspeakably cute name „Encrsypter“. It is based on aes-gcm, an AES encryption library (or „crate“ in Rust terms), that got audited successfully by the nccgroup a few months ago.
The full source code is available in my bitbucket repo. [Update: I’m currently working on an updated post with the new Cucumber-rs version. For this tutorial, please checkout the branch cukes_0.6.0 and, of course, stay tuned for the update.]
For training purposes, I recommend removing the tests/ directory, because we will successively build it up, as we go through the tutorial.
Writing Cucumber-based Tests
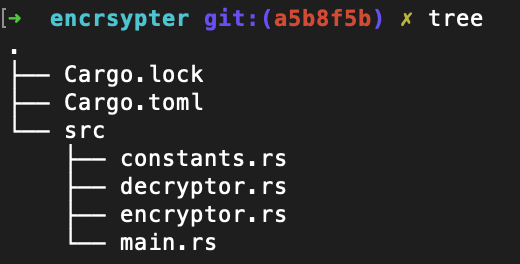
Before we add the sources for our test cases, let’s be aware of the test object’s project layout. We will start with the following directories and files:
Before we can code the test, we must add a cargo-compatible subproject structure. On your favorite command line, please create the following directories with these terminal commands (all directories relative to the project root):
mkdir tests
mkdir tests/features
mkdir tests/steps
We will create and store our feature file, that specifies the test steps of our Cucumber test, in the features/ subdirectory, whereas the steps‘ implementations will go to steps/. But first of all, we will prepare the central configuration. As described in the official documentation, we create a file called cucumber.rs in tests/ with the following content:
#[path = "../src/encryptor.rs"] mod encryptor;
#[path = "../src/decryptor.rs"] mod decryptor;
#[path = "./steps/encrypt_decrypt_steps.rs"] mod encrypt_decrypt_steps;
use cucumber::cucumber;
use std::borrow::Cow;

pub struct World<'a> {
    encryptor: encryptor::Encryptor<'a>,
    decryptor: decryptor::Decryptor<'a>,
    encrypted_base64: String,
    decrypt_result: String
}

impl cucumber::World for World<'_> {}
impl std::default::Default for World<'_> {
    fn default() -> World<'static> {
        let key = &[1; 32];
        let nonce = &[3; 12];

        World { encryptor: encryptor::Encryptor{ input: Cow::Borrowed(""), key, nonce },
                decryptor: decryptor::Decryptor{ file_path: "./testfile.txt", key, nonce },
                encrypted_base64: "".to_string(),
                decrypt_result: "".to_string()
        }
    }
}

cucumber! {
    features: "./tests/features/", // Path to our feature files
    world: crate::World, // The world needs to be the same for steps and the main cucumber call
    steps: &[
        encrypt_decrypt_steps::steps // the `steps!` macro creates a `steps` function in a module
    ]
}
The World struct contains the mutable instances of our test objects: The encryptor and decryptor, that serve to encrypt and decrypt messages using AES. Further, we will maintain special fields to keep track of their respective outputs. The cucumber! block serves as our entry point, where we perform the basic configuration, that gets our Cucumber test up and running: We…
- … tell Cucumber where to find feature files.
- … specify the test’s World struct, that contains our test objects.
- … declare the module, that contains our step implementations.
The next part of configuration is done in the project’s Cargo.toml. Again according to the official documentation, we should specify dependencies and a test directive like this:
[[test]]
name = "cucumber"
harness = false # Allows Cucumber to print output instead of libtest

[dev-dependencies]
cucumber = { package = "cucumber_rust", version = "^0.6.0" }
base64 = "0.12.3"
In terms of dependencies, we need the cucumber_rust package to run our tests, then we need the base64 package, because we will work with and do assertions on raw bytes. Although not entirely necessary, it comes in handy for visualisation purposes.
Under [[test]], we give our Cucumber test a name, and we route execution outputs to stdout. We will see its use later, when we finally come to the executing part.
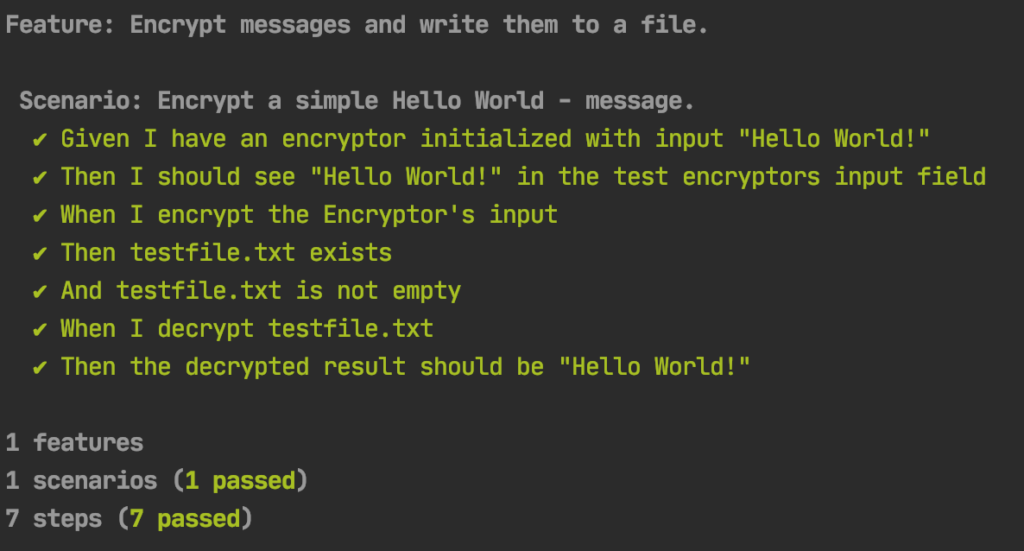
Alright, the config is done. Now we are ready to specify our first test. We will encrypt a small „Hello World!“ message, give it a rough sanity check, and then we decrypt it back and hope, that the decrypted output matches our input. Under ./tests/features, please create the file encryptor.feature. The containing test specification should roughly look like this:
Feature: Encrypt messages and write them to a file.

  Scenario: Encrypt a simple Hello World - message.
    Given I have an encryptor initialized with input "Hello World!"
     Then I should see "Hello World!" in the test encryptors input field
     When I encrypt the Encryptor's input
     Then testfile.txt exists
      And testfile.txt is not empty
     When I decrypt testfile.txt
     Then the decrypted result should be "Hello World!"
This describes, what we want to accomplish; we want to encrypt the string „Hello World!“, check, whether the output is there and whether it is not completely broken. Then we want to decrypt that output back and check, whether the output is the same as our input message. Next, we have to actually automate this test by implementing the Givens, Whens, Thens and Ands.
Step Implementation Files
So far we have told Cucumber, where to find its stuff, and we created a written test specification. Great, we are almost there. The last step is to weave the magic into the Gherkin steps, that do the heavy lifting, when Cucumber reads a step in the current feature file. Lets check out the following example step and see, what that means:
when "I encrypt the Encryptor's input" |world, _step| {
    world.encryptor.write_encrypted();
};
This means whenever the Cucumber engine finds a step, that matches „When I encrypt the Encryptor’s input“ inside the feature file, the code within the closure is executed. Here, we encrypt some random text.
Regular expressions are usable, too:
given regex r#"^I have an encryptor initialized with input "([\w,\s,!]+)"$"# (String) |world, text_to_encrypt, _step| {
        // the # are necessary to prevent the inner quotations marks as part of the String
        world.encryptor.input = Cow::Owned(text_to_encrypt);
    };
This step defines the text, that we want to encrypt using the When step from above. Here, the text is derived from the feature file by matching the regular expression in r# and the enclosing capture group ([\w,\s,!]+). The value, that was read by the capture group, goes to the closure parameter after world, in this case text_to_encrypt. Note that the „r“ in r# stands for „raw string“ instead of „regular expression“. Raw strings are a means to spare us from copious amounts of escape slashes within the regular expression string; otherwise, they are regular strings. I won’t go into too much detail here. If you want to learn more about them, check out this post about raw string literals.
By using the regular expression above, we could have written the steps in our feature file like the following:
Given I have an encryptor initialized with input "Hi I am Floh"
=> encryptor input is "Hi I am Floh"
Given I have an encryptor initialized with input "99 bottles of beer on the wall…"
=> encryptor input is "99 bottles of beer on the wall…"
Given I have an encryptor initialized with input "Your ad here"
=> encryptor input is "Your ad here"
Putting all the knowledge together, here is the sample implementation for our test steps. Please put it into ./tests/steps/encrypt_decrypt_steps.rs (related to the project root).
use cucumber::steps;
use std::fs;
use std::path::Path;
use std::borrow::Cow;

steps!(crate::World<'static> => {
    given regex r#"^I have an encryptor initialized with input "([\w,\s,!]+)"$"# (String) |world, text_to_encrypt, _step| {
        // the # are necessary to prevent the inner quotations marks as part of the String
        world.encryptor.input = Cow::Owned(text_to_encrypt);
    };

    then regex r#"^I should see "([\w,\s,!]+)" in the test encryptors input field"# (String) |world, expected_text, _step| {
        assert_eq!(expected_text, world.encryptor.input);
    };

    when "I encrypt the Encryptor's input" |world, _step| {
        world.encryptor.write_encrypted();
    };

    then "testfile.txt exists" |_world, _step| {
       let testfile_path = Path::new("./testfile.txt");
       assert_eq!(testfile_path.exists(), true);
    };

    then "testfile.txt is not empty" |world, _step| {
        let enc_message = fs::read("./testfile.txt").expect("Could not read test file.");
        world.encrypted_base64 = base64::encode(&enc_message);

        assert_eq!(world.encrypted_base64.len() > (0 as usize), true);
    };

    when "I decrypt testfile.txt" |world, _step| {
        world.decrypt_result = world.decryptor.read_decrypted();
    };

    then regex r#"^the decrypted result should be "([\w,\s,!]+)"$"# (String) |world, expected_text, _step| {
        assert_eq!(expected_text, world.decrypt_result);
    };
});
Now we are ready for the first test run. Please execute the following in your favorite terminal:
cargo test --test cucumber
If all goes well, it shows us a positive test result:
Conclusion: Cucumber in Different Languages
This is by no means the end of Cucumber’s options and possibilities. There are many many many more well maintained ports for many different platforms out there. Not all of them may be offcial, e.g. the Rust port we used today, but they are nonetheless maintained and fully functional. And they contributes to its well deserved popularity as well as the official ports. This is what counts in the end.
For Cucumber-rs it’s not the end of possibilities, too, as version 0.7 has been released recently. It brings asynchronous test support and a new builder-based approach to the table. I’m hyped to try it out, especially because I love asynchronous coding (Please don’t judge me..)
But for now, this is a good starting point to read more about other facettes of test automation. For example, you can learn how to set up a Zalenium cluster for distributed browser UI testing. It is well-suited to be combined with Cucumber. If you’d rather learn more about unconventional and unstructured automation testing, you might like my article about fuzzing in Java. Also, since I make heavy use of Rust Modules, I have written a quick tutorial about how to use them without hassle.
Have a great day!
EDIT Nov. 2021: A lot of things have been worked on in Cucumber Rust, so I compiled a comprehensive summary about the most crucial changes. Hope you enjoy it!
And btw, if you are interested in test automation, but Rust is not particularly your cup of tea: I’ve compiled an entry-level TA tutorial with Python. Check it out!