To create a new Linux user is one of the most common task in traditional Linux system administration. It is so popular that there are even two command line utilities fully dedicated to the task: adduser (Debian and its derivates) and useradd (all). And since it’s so popular many different administrators have many different solutions for the same problem.
Here I present mine. Note that I prefer sudo over working as root, but the steps work with root as well. Just omit the sudos.
Create a personalised user group. $ sudo groupadd newuser
Create the user with a home directory, a good default shell, its user group and further desired groups assigned. $ sudo useradd -m -s /bin/bash -g newuser -G sudo,orga newuser
Set the user’s initial password. $ sudo passwd newuser
Prepare SSH access for our newly created Linux user
If required, we can now enable the user to connect to our machine via SSH. We assume that the SSH demon is up and running and the user’s public key is available on our machine.
Change into the user’s home directory. $ sudo cd /home/newuser/
Create the .ssh directory. $ sudo mkdir .ssh
Set the directory permissions of .ssh to 0700 (read-write-execute only for the user). $ sudo chmod 0700 .ssh/ Note that the execute permission is necessary to access the directory; read does not suffice. This might be a little counterintuitive for new admins. (It surely was for me.)
Change into our meticulously prepared directory. $ sudo cd .ssh/
cat the user’s public key into a new file called authorized_keys. sudo cat /path/to/pubkey > authorized_keys
Set the authorized_keys file permissions to 0600. sudo chmod 0600 authorized_keys
Make sure that everything we created is assigned to the new user. cd .. sudo chown -R newuser:newuser .ssh/
Now the user should be able to connect to us with SSH.
User creation is a staple task when working with Linux servers, and now you have a solid solution at hand that will lighten up your daily workload. So long. I hope this little sheet was useful to you. Usually I write about Rust, test automation and business topics. If you want to read more from me, this post combines Rust and test automation. In my day job, I also do lots of test automation, but here my key focus is Java. Hence, if you are rather interested in that, I’m also talking about fuzzing with Java.
Or if you miss a detail, or you want to get your hands a little dirtier than just cheat sheet level, Linuxize has an in-depth post about the nitty gritty parts of user administration. It really helped me out a lot in the past.
cucumber-rust has had a long way, since my last post about the 0.7 release in October 2020. It’s time to come back and see what happened since back then. First of all, starting from the initial 0.8.0 release, I will dig through the changelog and evaluate my favorite changes. Then we will update the Cucumber tests of my encrspyter project to the most recent version. Lots of stuff to do, so let’s go!
New things first
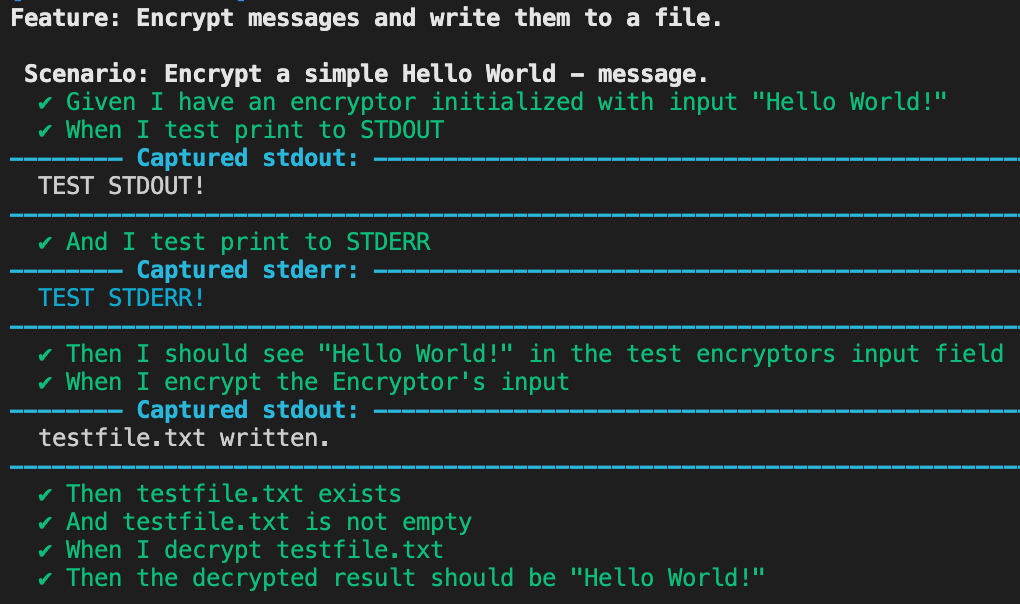
Let’s start soft: With 0.8.4, we got a --debug command line flag that leverages the test execution to nicely print stdout and stderr for each executed step. We can activate the debug mode in the runner creation code of our test’s main function:
fn main() {
    let runner = cucumber::Cucumber::<EncrsypterTestWorld>::new()
        .features(&["./tests/features/"])
        .steps(encrypt_decrypt_steps::steps())
        .debug(true); // This activates the new debug mode
    ...
}
By running cargo test, we can see it in action:
Neat, right?
t!-Macro extended with a World parameter type
Tiny but neat addition: We can now add the type of our Cukes World-object to the t!-closure.
Although the generated code is the same as without the explicit type, it adds a bit more Rust-style expressivity. Sweet!
New callback methods for the Cucumber runner: before and after
In vanilla Cucumber, I admired its feature to define hooks that intercept the execution of a feature or a scenario. You can write some code and tell Cucumber to execute it before, after or before and after a scenario, feature or even a step. This is useful to for example set up or tear down a test database before or respectively after a test run.
With the release of 0.9.0, we can do similar things in Rust, too. There is a significant implementation difference to vanilla Cukes though: Our hooks won’t be picked up from wherever they are defined, but are defined as properties of the Cucumber runner instead. To compensate, our before and after hooks come with powerful query options to decide where to execute the defined method.
The second difference is that they are not officially called „hooks“ but „lifecycle methods“ instead. I might get this wrong due to habits. Please bear with me.
Lets head into an example. Given 2 features, one of them in English, one of them in German, each in 2 separate files:
# Feature 1 (English description)
Feature: Encrypt messages and write them to a file.

  Scenario: Encrypt a simple Hello World - message.
    Given I have an encryptor initialized with input "Hello World!"
     When I test print to STDOUT
      And I test print to STDERR
     Then I should see "Hello World!" in the test encryptor's input field
     When I encrypt the encryptor's input
     Then testfile.txt exists
      And testfile.txt is not empty
     When I decrypt testfile.txt
     Then the decrypted result should be "Hello World!"
# language: de
# Feature 1 (German description)
Funktionalität: Verschlüssele Nachrichten und schreibe sie in eine Datei.

  Beispiel: Encrypt a simple Hello World - message.
    Angenommen I have an encryptor initialized with input "Hello World!"
     Wenn I test print to STDOUT
      Und I test print to STDERR
     Dann I should see "Hello World!" in the test encryptor's input field
     Wenn I encrypt the encryptor's input
     Dann testfile.txt exists
      Und testfile.txt is not empty
     Wenn I decrypt testfile.txt
     Dann the decrypted result should be "Hello World!"
What we want to do now is get greeted and dismissed in the respective language. We will define proper lifecycle methods on our Cucumber runner to do that. In the main method:
    let english_feature_name = "Encrypt messages and write them to a file."; // full string filter for the English...
    let german_feature_pattern = Regex::new("Verschlüssele Nachrichten.*").unwrap(); // and a Regex filter for the German variant.

let runner = cucumber::Cucumber::<world::EncrsypterTestWorld>::new()
.features(&["./tests/features/"])
        .steps(crate::encrypt_decrypt_steps::steps())
        .language("de")
        .before(feature(english_feature_name), |_ctx| {
            async { println!("Greetings, encryptor!") }.boxed()
        })
        .after(feature(english_feature_name), |_ctx| {
            async { println!("Goodbye, encryptor!") }.boxed()
        })
        .before(feature(german_feature_pattern.clone()), |_ctx| { // clone is necessary here due to the trait bounds of Inner<Pattern>
            async { println!("Hallo, Verschlüsselnder.") }.boxed()
        })
        .after(feature(german_feature_pattern), |_ctx| {
            async { println!("Tschüss, Verschlüsselnder.") }.boxed()
        });
feature() expects either the full feature description as a &str or a valid regex::Regex() matching your targets‘ description string. The latter requires the regex module as a dependency in your Cargo.toml, but it will provide you a highly powerful filtering tool, so adding that additional dependency is highly recommended.
Executing cargo test will show us what we expect. For the English feature file:
Greetings, encryptor!
Feature: Encrypt messages and write them to a file.

[...]

  ✔ Then the decrypted result should be "Hello World!"
Goodbye, encryptor!
For the German Feature file:
Hallo, Verschlüsselnder.
Funktionalität: Verschlüssele Nachrichten und schreibe sie in eine Datei.

[...]

  ✔ Dann the decrypted result should be "Hello World!"
Tschüss, Verschlüsselnder.
Great stuff! Last but not least, let me note that this does not only work with Feature, but with Scenario and Rule, too. You can even create more custom filters by combining them with And and Or. Please refer to the cucumber-rust code base for more about that.
Heads up, a breaking change!
With 0.9.0 we got one significant change in Cukes‘ public API, but don’t worry: Fixing it is quickly done and even quite easily automatable. If you review my guide on cucumber-rust for 0.7, you will see the related step definitions written like this:
.given_regex_async(
    r#"^I have an encryptor initialized with input "([\w\s!]+)"$"#,
    t!(|mut world, texts_to_encrypt, _step| {
        world.encryptor.input = Cow::Owned(texts_to_encrypt[1].to_owned());
        world
    }),
)
This throws a compiler error now stating that the „signature“ of the t! macro has changed: Instead of the regex matches object in parameter #2 and _step in parameter #3, we now have a single StepContext object that contains the properties matches and step.
Therefore, in the above example we have to do the following:
Remove the _step parameter entirely
Rename our matches parameter texts_to_encrypt to something that reflects the StepContext type: ctx
Replace the occurrences of texts_to_encrypt with ctx.matches[index_used_previously]
For _step we have no replacements to do, because we didn’t use it in the first place, so that’s basically it. The runnable step definition should now look like this:
.given_regex_async(r#"^I have an encryptor initialized with input "([\w\s!]+)"$"#, t!(|mut world, ctx| {
                world.encryptor.input = Cow::Owned(ctx.matches[1].to_owned());
                world
    }),
)
Personally I like this particular change quite a lot, because it keeps the already loaded t! macro clean and organised. What do you think? Feel free to let me know in the comments below.
Feature: Add before and after lifecycle functions to the Cucumber builder. This function takes a selector for determining when to run 'before' or 'after', and a callback

Feature: add language argument to Cucumber builder to set default language for all feature files (ON HOLD)
Encrsypter’s Cucumber tests in a new look
I updated the tests in Encrsypter’s project master and in the cukes_0.9.0 branch, so if you want to see the changes in full action, give it a git pull on the master or a git checkout on the mentioned branch and enjoy.
Conclusion: great changes and improvements
Phew, so long. cucumber-rust really does have a long way, and many things have changed for more Cukes excitement. Personally I like the current implementation state really a lot and I’m looking forward to seeing its bright future. But for now, let’s wrap up the wrapup, shall we?
If you want to read more about Cukes in Rust, here’s my intro to Cucumber in Rust written for 0.7. Or you might say „meh, I prefer the vintage things of life, give me the vanilla stuff“. In that case, here you can find the original version of my intro guide. And last but for sure not least, here’s the project’s full changelog with all the goodness listed. Happy cuking!
If you struggle as regularly with the super explicit Rust modules system as I do, then welcome to the club. For us poor souls, I decided to write down a quick cheat sheet about how to structure our modularized code.
Limitations
This post focuses on the directory and file structure only. It does not cover use, mod, crate:: et. al. in-depth. If you would like me to cover them, feel free to let me know in the comments.
The Module Setup
Consider a generic cargo new – generated project with one module we want to expose. We will have the following participating files and folders named in a very generic way here. These are listed from deep inside the project tree to higher levels:
file1.rs, file2.rs,... that contain code we want to expose
public functions and structs are written here using the keyword pub at the beginning of their declaration
macros come with their #[macro_export] anyways, so no further changes needed
a directorysrc/folderthat contains the files from 1.
a file src/folder.rsthat lists all files within folder that we want to expose by doing:
pub mod file1;
pub mod file2;
…
our main.rs (or lib.rs, depending of your app design) that references the exposed code by doing:
mod folder;
use crate::folder::file1::pub_function1
use crate::folder::file1::pub_function2
use crate::folder::file2::pub_function1
use crate::folder::file2::pub_function2
….
Please check this bitbucket repo for an in action-demo. We will use the maths Rust module next. The macros module is a bonus for you. Here’s a quick mapping of the file and folder names according to the schema above:
src/maths/functions1.rs, src/maths/functions2.rs
src/maths/
src/maths.rs
src/main.rs
When we review those files, we will see that they do exactly, what the schema expects us to.
So far about Rust modules…
I hope this little sheet will help you to remember the complex structure of Rust modules. If you have an improvement idea, or if you found a defect, please feel free to drop it in the comments – I watch the comment sections regularly – or send me an email.
On last year’s November 1st, I earned a very special achievement: 1 full year in a leadership position leading a group of 3 smart & experienced QA Engineers. This is quite a biggie of a milestone for my professional and personal career and I’m incredibly thankful for my team and my boss for putting so much trust in me. It is still early 2021, thus it is time to use the cold wintery days to reflect on what I have learned and why I chose this career path in the first place.
Why did I pick up the leadership path?
I’m a natural supporter; the more I can help others to be successful, the happier I am. But as an individual contributor, you are responsible for your own stuff. You have to do your tasks and focus on your work. Of course doing your own tasks helps your team mates, your lead and the company in general, but that’s an indirect effect. If you want to help people directly to succeed, you need to shift your daily work’s focus towards that. This grants you time and space to listen to your peer’s needs, to abstract away the company politics and to make sure that your peers can work in a clean and focused environment. Applying these principles, I noticed strong growth in collaboration and an increase in speaking-up on a high technical QA level.
This is where I want to draw my own professional satisfaction from.
Now thing with people is that they want to get recognized for their own personal achievements. I’m no different here, hence changing my priorities was a tough lesson to learn. But that’s OK. It’s part of the challenge, and in the long run it is the right way for me.
What is leadership NOT about?
Hot take: Picking up a leadership role is not a promotion, but a completely different career path. Even if you lead the same way as I do doing day-to-day tasks after management, you have too many tasks that are different from your handson-stuffs to do, and thus require a different skill set. Let me give you a personal example.
My job then…
For me as a testing professional, the IT business world is red or green. Something is implemented according to the specs or it is not. A test is either green or red (i.e. not yellow). Either the test or the app failed. You get the image. Much more important: Things can be proven right or wrong. We have specs, acceptance criteria and various different models for that.
… vs. now
This is history. Now I take on decisions, with their outcome being at least most of the time uncertain in the short term. It can take weeks or even months until I know, if my decision was correct. And if so: to what degree? Even correct decisions are not a 1 on the logical output wire. Rather, the truth lies somewhere in between; an aspect you have to constantly deal with. That’s OK, but it’s a significant difference we must be aware of. The next point is that it comes with a change in your skillset: You must stay confident in times of uncertainty.
Consequently, you cannot tell other people that your decision X is correct. You have to point out advantages, tradeoffs and set the decision into context to actually convince people that your decision is the best for the job at hand. Sure, as individual contributors we have freedom within a certain frame depending on our respective leads, but your audience will be different and it is certainly going to be larger. Therefore, we have again a shift in our skillset.
These are my 2 most prominent examples on the take why I think that being an IC and being a lead are two completely different jobs. What do you think about it? Agree or disagree? Let me know in the comments below.
How do I want to lead?
They say „Sometimes a picture says more than 1000 words“, and when you type „leader vs boss“ into Google, you eventually stumble upon this masterpiece of a motivational sort-of-a-meme-thingy:
Boss vs. Leader. Shoutouts to whoever made this gem. If you know the artist, please drop a link the comments. 🙂
The bottom part sums up my aspired style of leadership so well that I had to post it here. To implement the depicted style, I apply six key principles:
Write up a lean agile process
I try keeping our testing process as lean and clutter-free as possible by forming few key principles and write them down in our project – Confluence as a manifesto. These principles have to be lived by day by day, but nothing more and nothing less.
Write it up together with your peers
The key principles of our testing process are living documents that are formed by the team (including myself). We discuss things we want to do regularly and reliably together, put them into Confluence, observe them and adapt them if necessary. This also forces us to keep the principles few and short to prevent us from overengineering the process. A valuable feedback loop.
Give your peers as much freedom as possible
Once the key principles are in place, I give the team as much freedom in their day to day work as possible. Basically, I set priorities to the tasks and recommend (!) assignments. Anything else is up to the team. The task assignments can change freely between the team members, as the team sees fit.
Trust, trust & again trust
Trust is the mortar of a working human relationship, and organizational relationships are no exception. As such, they require mutual trust like any other relationship. Trust is an important part of respect we owe the peers we hired to get the job done. If you don’t trust them, they will notice, and they – justified – won’t be happy about that. So please make sure that you pay your peers as much trust as possible. You as a lead want to be trusted, too, right?
As a great side effect, trusting your peers will give the whole team a huge amount of freedom. That means lots of freedom for you, too! Valuable free time to focus on all the outside requests that drop into your mail box every day.
Be part of your team
By now, I talked a lot about the team members. When I do that, I include myself. I am a part of my team. I work at their side and implement a „we“-perspective into our day-to-day work. This keeps up the motivation and changes the way people inside and outside your team will see your team’s efforts.
Work together
Setting up the process chores once and only doing minor modifications from time to time, you should have some time left. I use this time to grab tasks. I am careful what to pick though, because I did a huge mistake in the past: By misunderstanding the block-removing part of the leadership job, I tended to pick the biggest and nastiest fundamental tasks available. As a result, it took me aaaages to finish them, because I just don’t have fulltime hours to work on them. I have meetings, have to answer questions, mails etc. That’s the major part of the job now. To fix that, I decided to give these tasks to the team, trust them and only do support on demand. In the meantime, I pick simple non-blocking tasks, e.g. automating single not-too-critical tests. Even these simple tasks increase your team’s free time and are highly appreciated inside and outside.
Conclusion
So long, these were my learnings of one full year of the adventure that is called leadership. And what an adventure it is. I absolutely recommend it to you in any case: Try it out, get a grip on leadership and experience firsthand, how much you grow as a person and as a professional. If you like it, that’s awesome. If not, thats Ok, too. Feel invited to read up here about why it is a good thing to be in technical QA nowadays instead. You should definitely give it a try.
Also, if you are especially curious about how my first entrepreneurial challenge turned out, check out my most recent blog post, where I write about my experience publishing an app to the Google Playstore. Stay curious, everybody!
Recently I have introduced us to Cucumber and how to use it in Rust, and while doing the writeup, cucumber-rust 0.7 has been released bringing a huge set of new and unique features. After a closer look through the readme, the strong focus on asynchronous test execution caught my eye. And since I’m a huge fan of ansynchronous programming having done lots of pet stuffs in NodeJS, seeing both my favorite BDD framework and my favorite system level language going strong in async got me severely hyped.
So let’s go!
Reminder: What is Cucumber?
Cucumber is a framework that implements Behavior Driven Development. The rules of BDD can be summarized as formulizing the requirements step by step in a more and more technical way. We start with the written requirements by your fellow business department and reformulate the requirements into a machine-readable format. Next, we use this text version to write an automated test case that fails, and implement the feature until the test passes. This flow gives it the popular resemblance to Test Driven Development. Cucumber leverages BDD by providing the machine- and human-readable layer based on so-called feature files. These use the Gherkin syntax, a simple syntax based on the keywords Given, When, Then, And and But.
Cucumber is still widely used as a test runner, although BDD is rarely actually applied due to the all-time-popular time limitation in nowaday’s software projects. Another rather unfortunate similarity to TDD.
Reminder: What is Rust?
Rust is a fairly new and rising system level programming language that operates in the same markets as C++ and friends. Besides system-level performance, its main focus lies in builtin security and safety. Furthermore, due to its security and safety-heavy design, it is able to completely omit automated memory management. It just doesn’t need it while still guaranteeing memory safety.
All these points are topped off by an exceptional developer experience: The Rust toolchain brings its full-fledged API documentation and its popular text book right to your command line-operating finger tips, and even compiler errors are designed as tiny educational lessons.
Our Test Object: A Simple AES Encryption Tool
In my previous post, we talked about a small encryption tool with the unspeakable name „Encrsypter“, which was started, when I did my first baby steps in Rust. Today it will serve us once more as our example test object.
The tool is based on aes-gcm, an AES encryption library (or „crate“ in Rust terms) that got audited successfully by the nccgroup. The full source code is available in my bitbucket repo, but for training purposes, I recommend removing the tests/ directory, as we will incrementally build it up during this tutorial.
Writing Cucumber-based Tests
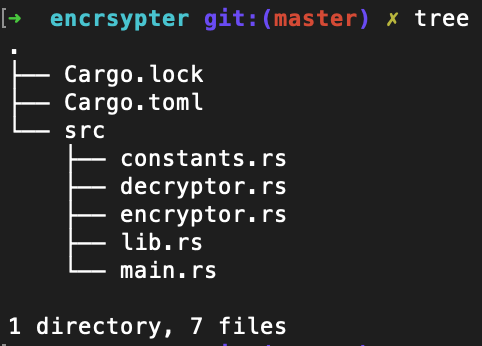
Before we add the sources for our test cases, let’s check the test object’s project layout. We will start with the following directories and files:
encrsypter’s project directory without tests
Before we can start coding the test, we must add a cargo-compatible test subproject structure. On your favorite command line, please create the following directories with these terminal commands (all directories relative to the project root):
mkdir tests
mkdir tests/features
We will create and store our feature file that specifies the test steps of our Cucumber test in the features/ subdirectory. The step implementation will later go directly to the tests/ directory alongside the central configuration that we will create now. As described in the official documentation, we create a file called cucumber.rs in tests/ with the following content:
mod encrypt_decrypt_steps;

use async_trait::async_trait;
use encrsypter_lib::{decryptor, encryptor};
use std::borrow::Cow;
use std::convert::Infallible;

pub struct EncrsypterTestWorld {
    encryptor: encryptor::Encryptor<'static>,
    decryptor: decryptor::Decryptor<'static>,
    encrypted_base64: String,
    decrypt_result: String,
}

#[async_trait(?Send)]
impl cucumber::World for EncrsypterTestWorld {
    type Error = Infallible;

    // Much more straightforward than the Default Trait before. :)
    async fn new() -> Result<Self, Infallible> {
        let key = &[1; 32];
        let nonce = &[3; 12];

        Ok(Self {
            encryptor: encryptor::Encryptor {
                input: Cow::Borrowed(""),
                key,
                nonce,
            },
            decryptor: decryptor::Decryptor {
                file_path: "./testfile.txt",
                key,
                nonce,
            },
            encrypted_base64: "".to_string(),
            decrypt_result: "".to_string(),
        })
    }
}

fn main() {
    // Do any setup you need to do before running the Cucumber runner.
    // e.g. setup_some_db_thing()?;
    let runner = cucumber::Cucumber::<EncrsypterTestWorld>::new()
        .features(&["./tests/features/"])
        .steps(encrypt_decrypt_steps::steps());

    // You may choose any executor you like (Tokio, async-std, etc)
    // You may even have an async main, it doesn't matter. The point is that
    // Cucumber is composable. :)
    futures::executor::block_on(runner.run());
}
The EncrsypterTestWorld struct contains the mutable instances of our test objects: the encryptor and decryptor that serve to encrypt and decrypt our messages using AES. Further we will maintain special fields to keep track of the test object’s respective outputs. In version 0.7 we have an actual main function that serves as our entry point instead of the cucumber! macro in the previous version. Here we perform the basic configuration that gets our Cucumber test up and running: We…
… specify the test’s World struct containing our test objects, …
… tell Cucumber where to find feature files, …
… declare the module that contains our step implementations and …
… declare, which asynchronous executor we use to resolve the async step calls.
During this tutorial we use async-std supported by the futures and async-trait package. The latter is necessary to extend traits with asynchronous functionality that is not officially supported as of now (Rust 1.47.0). async-std is by no means set in stone though; you can use tokio or any other asynchronous runner equally well. I’m just much more familiar with async-std and futures.
The next config part is done in the project’s Cargo.toml. Again according to the official documentation, we should specify the dev-dependencies and the [[test]] directive as shown here:
[package]
name = "encrsypter"
version = "0.1.0"
authors = ["Florian Reinhard <me@florianreinhard.de>"]
edition = "2018"

# See more keys and their definitions at https://doc.rust-lang.org/cargo/reference/manifest.html

[dependencies]
aes-gcm = "0.6.0"
rand = "0.7.3"

[lib]
name = "encrsypter_lib"
path = "src/lib.rs"

[[test]]
name = "cucumber"
harness = false # Allows Cucumber to print output instead of libtest

[dev-dependencies]
cucumber = { package = "cucumber_rust", version = "^0.7.0" }
base64 = "0.12.3"
futures = "0.3.6"
async-trait = "0.1.41"
In terms of dependencies we need the cucumber_rust package to run our tests and the futures and async-trait packages as discussed above.
Then we need the base64 package, because we will work with and do assertions on raw bytes. Although not entirely necessary, it may come in handy for visualisation purposes.
Under [[test]] we give our Cucumber test a name and we route the execution output to stdout to have a nice and tidy output, where we need it.
Alright, the config is done. Now we are ready to specify our first test case. We will encrypt a small „Hello World!“ message, give it a rough sanity check, and then we decrypt it back and hope that the decrypted output matches our input. Under ./tests/features, please create the file encryptor.feature. The containing test specification should roughly look like this:
Feature: Encrypt messages and write them to a file.

  Scenario: Encrypt a simple Hello World - message.
    Given I have an encryptor initialized with input "Hello World!"
     Then I should see "Hello World!" in the encryptor's input field
     When I encrypt the encryptor's input
     Then testfile.txt exists
      And testfile.txt is not empty
     When I decrypt testfile.txt
     Then the decrypted result should be "Hello World!"
This describes, what we want to accomplish: We want to encrypt the string „Hello World!“ and check, whether the output is there and whether it is not completely broken. Then we want to decrypt that output back and check, whether the output is the same as our input message. Next, we have to actually automate this test by implementing the Givens, Whens, Thens and Ands in the feature file.
Step Implementation Files
So far we have told Cucumber, where to find its stuff, and we created a written test specification. Great, we are almost there. The last step is to weave the magic into the Gherkin steps that do the heavy lifting, when Cucumber reads a step in the current feature file. Lets check out the following example step and see, what that means:
.when_async(
    "I encrypt the encryptor's input",
    t!(|world, _step| {
        world.encryptor.write_encrypted();
        world
    }),
)
This means whenever the Cucumber engine finds a step that matches „When I encrypt the encryptor’s input“ inside the feature file, the code within the closure that is constructed by the builtin t! macro is executed. Here we encrypt some random text.
The t! macro creates a wrapper around the step-implementing closure that extends it with asynchronous and future-driven functionality. It is exclusive to the asnychronous step methods. In the regular non-asynchronous step methods you can use regular closures.
Back to step implementations; regular expressions are usable, too:
.given_regex_async(
    r#"^I have an encryptor initialized with input "([\w\s!]+)"$"#,
    t!(|mut world, texts_to_encrypt, _step| {
        world.encryptor.input = Cow::Owned(texts_to_encrypt[1].to_owned());
        world
    }),
)
This step defines the text that we want to encrypt using the When step from above. Here the text is derived from the feature file by matching the regular expression and its enclosing capture group ([\w\s!]+). The value that was read by the capture group goes to the custom closure parameter after world, in this case called text_to_encrypt. By using the regular expression above, we could have written the steps in our feature file like the following:
Given I have an encryptor initialized with input "Hi I am Floh"
=> encryptor input is "Hi I am Floh"
Given I have an encryptor initialized with input "99 bottles of beer on the wall…"
=> encryptor input is "99 bottles of beer on the wall…"
Given I have an encryptor initialized with input "Your ad here"
=> encryptor input is "Your ad here
„
Putting all the knowledge together, here is the sample implementation for our test steps. Please put it into ./tests/encrypt_decrypt_steps.rs (relative to the project root).
use cucumber::{t, Steps};
use std::borrow::Cow;
use std::fs;
use std::path::Path;

pub fn steps() -> Steps<crate::EncrsypterTestWorld> {
    let mut builder: Steps<crate::EncrsypterTestWorld> = Steps::new();

    builder
        .given_regex_async(
            r#"^I have an encryptor initialized with input "([\w\s!]+)"$"#,
            t!(|mut world, texts_to_encrypt, _step| {
                world.encryptor.input = Cow::Owned(texts_to_encrypt[1].to_owned());
                world
            }),
        )
        .then_regex_async(
            r#"^I should see "([\w\s!]+)" in the encryptor's input field$"#,
            t!(|world, expected_texts, _step| {
                assert_eq!(expected_texts[1], world.encryptor.input);
                world
            }),
        )
        .when_async(
            "I encrypt the encryptor's input",
            t!(|world, _step| {
                world.encryptor.write_encrypted();
                world
            }),
        )
        .then_async(
            "testfile.txt exists",
            t!(|_world, _step| {
                let testfile_path = Path::new("./testfile.txt");
                assert_eq!(testfile_path.exists(), true);
                _world
            }),
        )
        .then_async(
            "testfile.txt is not empty",
            t!(|mut world, _step| {
                let enc_message = fs::read("./testfile.txt").expect("Could not read test file.");
                world.encrypted_base64 = base64::encode(&enc_message);

                assert_eq!(world.encrypted_base64.len() > (0 as usize), true);
                world
            }),
        )
        .when_async(
            "I decrypt testfile.txt",
            t!(|mut world, _step| {
                world.decrypt_result = world.decryptor.read_decrypted();
                world
            }),
        )
        .then_regex_async(
            r#"^the decrypted result should be "([\w\s!]+)"$"#,
            t!(|mut world, expected_texts, _step| {
                assert_eq!(expected_texts[1], world.decrypt_result);
                world
            }),
        );

    builder
}
Please note that we use raw string literals written in r#...# in order to spare us escaping intentional doublequotes and backslashes.
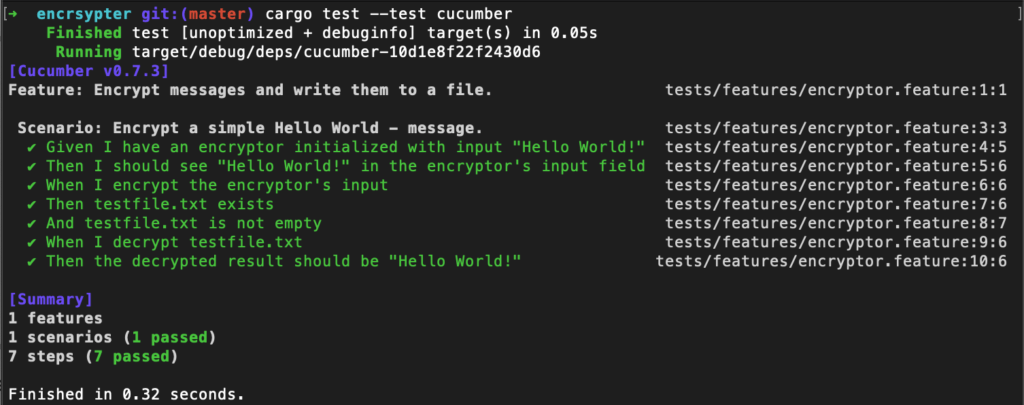
Now we are ready for the first test run. Please execute the following command in your favorite terminal:
cargo test --test cucumber
If all goes well, it shows us a positive test result:
All 7 Cucumber feature steps passed. Yay!
Conclusion: The All New Cucumber-Rust
The new version line cucumber-rust 0.7 brought a lot of super powers to the tips of our test automation fingers. With asynchronous tests, we are a huge step closer to real test parallelization and thus to less performance headaches, a quite notorious problem in test automation. The default trait got replaced by an intuitive and asynchronous World::new function, which makes working with Worlds much more intuitive, and as a great personal side effect, I got rid of the hassle that the World instance’s lifetime caused me. This helps me immensely to read, write and reason about the code. In future versions we might expect more simplifying changes to make asynchronous testing even more intuitive. For example with the power of procedural macros maybe we will get by without the t! macro ..?
I’m most certainly looking forward to the future versions.
If you are curious about how the test looked like in 0.6, here you can find my previous Cukes tutorial. Or if you’d like to know, here i talk about why I picked up test automation in the first place. And, as mentioned in my original Cucumber Rust article, here is my quick tutorial on how to use Rust Modules.
Have a great day & happy testing!
EDIT Nov. 2021: A lot of things have been worked on in Cucumber Rust, so I compiled a comprehensive summary about the most crucial changes in Cucumber Rust. Hope you enjoy it!
When I started my first QA role back in 2014, my first tasks included the maintenance and extension of a large test base, that was supposed to work for 4 different projects in parallel. It was based on Cucumber and the Ruby programming language, a stack I fell more and more in love with. This love still lasts to this day.
Therefore, it is time to relive the feeling, that is working with Cucumber from a fresh perspective, once more. To achieve this feeling we are going to apply an interesting little twist: We will code and test in the Rust programming language.
Rust, Ruby. 4 Letters and a capital R. Perfect!
What is Cucumber?
Cucumber is a framework, that implements Behavior Driven Development. The rules of BDD can be summarized as formulizing the requirements step by step in a more and more technical way. We start with the written requirements by your fellow business department and reformulate the requirements into a machine-readable format. Next, we use this text version to write an automated test case, that fails, and implement the feature up until the test passes. This flow gives it the popular resemblance to Test Driven Development. Cucumber leverages BDD by providing the machine- and human-readable layer based on so-called feature files. These use the Gherkin syntax, a simple syntax based on the keywords Given, When, Then, And and But.
Cucumber is still widely used as a test runner, although BDD is rarely actually implemented due to the all-time-popular time limitation in nowaday’s software projects. Another similarity to TDD, that is rather unfortunate.
What is Rust?
Rust is a fairly new and rising system level programming language, that operates in the same markets as C++ and friends. Besides system-level performance, its main focus lies in security and safety being builtin. Furthermore, due to its security and safety-heavy design architecture, it is able to completely omit automated memory management. It just doesn’t need it, while still guaranteeing memory safety.
All of these points are topped off by an exceptional developer experience: The Rust toolchain brings its full-fledged API documentation and its popular text book right to your command line-operating finger tips, and even compiler errors are designed as tiny educational lessons.
Our Test Object: A Simple AES Encryption Tool
I coded my first working Rust app, when I was learning its renowned ownership and borrow model. Usually, when it comes to the First App ™, I tend to write Fibonacci calculators in all kinds of setups: Fibonacci REST APIs, Fibonacci CLI calculators, Fibonacci FFI libs inside a Flutter app… But this time, i wanted something different. Something, that actually does stuff on a level worthy to let it be called a „system application“. So I decided to write a simple AES string encryption tool, that I gave the unspeakably cute name „Encrsypter“. It is based on aes-gcm, an AES encryption library (or „crate“ in Rust terms), that got audited successfully by the nccgroup a few months ago.
The full source code is available in my bitbucket repo. [Update: I’m currently working on an updated post with the new Cucumber-rs version. For this tutorial, please checkout the branch cukes_0.6.0 and, of course, stay tuned for the update.]
For training purposes, I recommend removing the tests/ directory, because we will successively build it up, as we go through the tutorial.
Writing Cucumber-based Tests
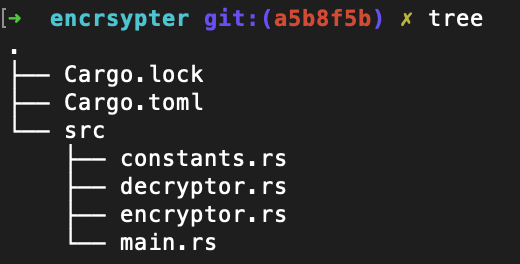
Before we add the sources for our test cases, let’s be aware of the test object’s project layout. We will start with the following directories and files:
encrsypter’s project directory without Cucumber tests
Before we can code the test, we must add a cargo-compatible subproject structure. On your favorite command line, please create the following directories with these terminal commands (all directories relative to the project root):
We will create and store our feature file, that specifies the test steps of our Cucumber test, in the features/ subdirectory, whereas the steps‘ implementations will go to steps/. But first of all, we will prepare the central configuration. As described in the official documentation, we create a file called cucumber.rs in tests/ with the following content:
#[path = "../src/encryptor.rs"] mod encryptor;
#[path = "../src/decryptor.rs"] mod decryptor;
#[path = "./steps/encrypt_decrypt_steps.rs"] mod encrypt_decrypt_steps;
use cucumber::cucumber;
use std::borrow::Cow;

pub struct World<'a> {
    encryptor: encryptor::Encryptor<'a>,
    decryptor: decryptor::Decryptor<'a>,
    encrypted_base64: String,
    decrypt_result: String
}

impl cucumber::World for World<'_> {}
impl std::default::Default for World<'_> {
    fn default() -> World<'static> {
        let key = &[1; 32];
        let nonce = &[3; 12];

        World { encryptor: encryptor::Encryptor{ input: Cow::Borrowed(""), key, nonce },
                decryptor: decryptor::Decryptor{ file_path: "./testfile.txt", key, nonce },
                encrypted_base64: "".to_string(),
                decrypt_result: "".to_string()
        }
    }
}

cucumber! {
    features: "./tests/features/", // Path to our feature files
    world: crate::World, // The world needs to be the same for steps and the main cucumber call
    steps: &[
        encrypt_decrypt_steps::steps // the `steps!` macro creates a `steps` function in a module
    ]
}
The World struct contains the mutable instances of our test objects: The encryptor and decryptor, that serve to encrypt and decrypt messages using AES. Further, we will maintain special fields to keep track of their respective outputs. The cucumber! block serves as our entry point, where we perform the basic configuration, that gets our Cucumber test up and running: We…
… tell Cucumber where to find feature files.
… specify the test’s World struct, that contains our test objects.
… declare the module, that contains our step implementations.
The next part of configuration is done in the project’s Cargo.toml. Again according to the official documentation, we should specify dependencies and a test directive like this:
[[test]]
name = "cucumber"
harness = false # Allows Cucumber to print output instead of libtest

[dev-dependencies]
cucumber = { package = "cucumber_rust", version = "^0.6.0" }
base64 = "0.12.3"
In terms of dependencies, we need the cucumber_rust package to run our tests, then we need the base64 package, because we will work with and do assertions on raw bytes. Although not entirely necessary, it comes in handy for visualisation purposes.
Under [[test]], we give our Cucumber test a name, and we route execution outputs to stdout. We will see its use later, when we finally come to the executing part.
Alright, the config is done. Now we are ready to specify our first test. We will encrypt a small „Hello World!“ message, give it a rough sanity check, and then we decrypt it back and hope, that the decrypted output matches our input. Under ./tests/features, please create the file encryptor.feature. The containing test specification should roughly look like this:
Feature: Encrypt messages and write them to a file.

  Scenario: Encrypt a simple Hello World - message.
    Given I have an encryptor initialized with input "Hello World!"
     Then I should see "Hello World!" in the test encryptors input field
     When I encrypt the Encryptor's input
     Then testfile.txt exists
      And testfile.txt is not empty
     When I decrypt testfile.txt
     Then the decrypted result should be "Hello World!"
This describes, what we want to accomplish; we want to encrypt the string „Hello World!“, check, whether the output is there and whether it is not completely broken. Then we want to decrypt that output back and check, whether the output is the same as our input message. Next, we have to actually automate this test by implementing the Givens, Whens, Thens and Ands.
Step Implementation Files
So far we have told Cucumber, where to find its stuff, and we created a written test specification. Great, we are almost there. The last step is to weave the magic into the Gherkin steps, that do the heavy lifting, when Cucumber reads a step in the current feature file. Lets check out the following example step and see, what that means:
when "I encrypt the Encryptor's input" |world, _step| {
    world.encryptor.write_encrypted();
};
This means whenever the Cucumber engine finds a step, that matches „When I encrypt the Encryptor’s input“ inside the feature file, the code within the closure is executed. Here, we encrypt some random text.
Regular expressions are usable, too:
given regex r#"^I have an encryptor initialized with input "([\w,\s,!]+)"$"# (String) |world, text_to_encrypt, _step| {
        // the # are necessary to prevent the inner quotations marks as part of the String
        world.encryptor.input = Cow::Owned(text_to_encrypt);
    };
This step defines the text, that we want to encrypt using the When step from above. Here, the text is derived from the feature file by matching the regular expression in r# and the enclosing capture group ([\w,\s,!]+). The value, that was read by the capture group, goes to the closure parameter after world, in this case text_to_encrypt. Note that the „r“ in r# stands for „raw string“ instead of „regular expression“. Raw strings are a means to spare us from copious amounts of escape slashes within the regular expression string; otherwise, they are regular strings. I won’t go into too much detail here. If you want to learn more about them, check out this post about raw string literals.
By using the regular expression above, we could have written the steps in our feature file like the following:
Given I have an encryptor initialized with input "Hi I am Floh"
=> encryptor input is "Hi I am Floh"
Given I have an encryptor initialized with input "99 bottles of beer on the wall…"
=> encryptor input is "99 bottles of beer on the wall…"
Given I have an encryptor initialized with input "Your ad here"
=> encryptor input is "Your ad here"
Putting all the knowledge together, here is the sample implementation for our test steps. Please put it into ./tests/steps/encrypt_decrypt_steps.rs (related to the project root).
use cucumber::steps;
use std::fs;
use std::path::Path;
use std::borrow::Cow;

steps!(crate::World<'static> => {
    given regex r#"^I have an encryptor initialized with input "([\w,\s,!]+)"$"# (String) |world, text_to_encrypt, _step| {
        // the # are necessary to prevent the inner quotations marks as part of the String
        world.encryptor.input = Cow::Owned(text_to_encrypt);
    };

    then regex r#"^I should see "([\w,\s,!]+)" in the test encryptors input field"# (String) |world, expected_text, _step| {
        assert_eq!(expected_text, world.encryptor.input);
    };

    when "I encrypt the Encryptor's input" |world, _step| {
        world.encryptor.write_encrypted();
    };

    then "testfile.txt exists" |_world, _step| {
       let testfile_path = Path::new("./testfile.txt");
       assert_eq!(testfile_path.exists(), true);
    };

    then "testfile.txt is not empty" |world, _step| {
        let enc_message = fs::read("./testfile.txt").expect("Could not read test file.");
        world.encrypted_base64 = base64::encode(&enc_message);

        assert_eq!(world.encrypted_base64.len() > (0 as usize), true);
    };

    when "I decrypt testfile.txt" |world, _step| {
        world.decrypt_result = world.decryptor.read_decrypted();
    };

    then regex r#"^the decrypted result should be "([\w,\s,!]+)"$"# (String) |world, expected_text, _step| {
        assert_eq!(expected_text, world.decrypt_result);
    };
});
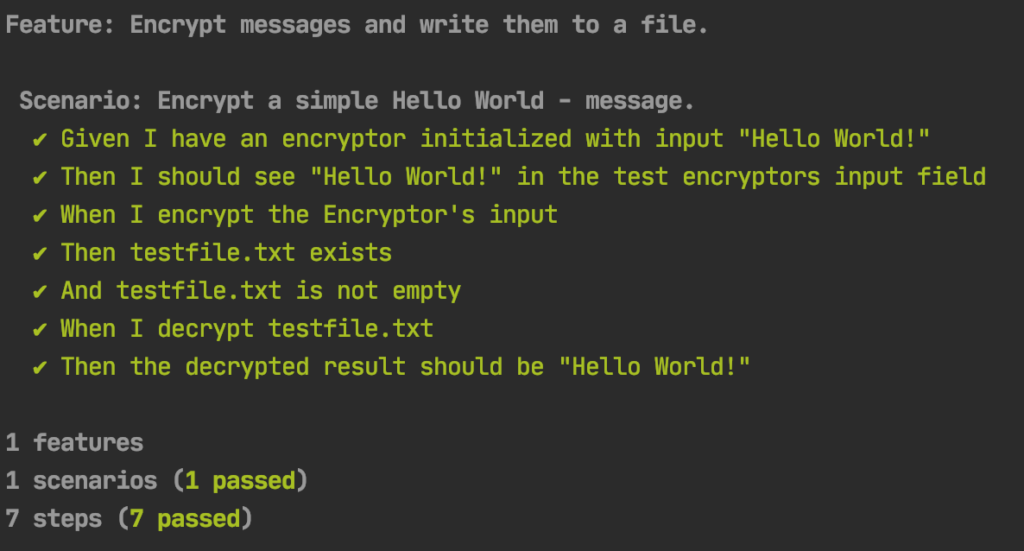
Now we are ready for the first test run. Please execute the following in your favorite terminal:
cargo test --test cucumber
If all goes well, it shows us a positive test result:
The test passed. Yay!
Conclusion: Cucumber in Different Languages
This is by no means the end of Cucumber’s options and possibilities. There are many many many more well maintained ports for many different platforms out there. Not all of them may be offcial, e.g. the Rust port we used today, but they are nonetheless maintained and fully functional. And they contributes to its well deserved popularity as well as the official ports. This is what counts in the end.
For Cucumber-rs it’s not the end of possibilities, too, as version 0.7 has been released recently. It brings asynchronous test support and a new builder-based approach to the table. I’m hyped to try it out, especially because I love asynchronous coding (Please don’t judge me..)
But for now, this is a good starting point to read more about other facettes of test automation. For example, you can learn how to set up a Zalenium cluster for distributed browser UI testing. It is well-suited to be combined with Cucumber. If you’d rather learn more about unconventional and unstructured automation testing, you might like my article about fuzzing in Java. Also, since I make heavy use of Rust Modules, I have written a quick tutorial about how to use them without hassle.
Have a great day!
EDIT Nov. 2021: A lot of things have been worked on in Cucumber Rust, so I compiled a comprehensive summary about the most crucial changes. Hope you enjoy it!
And btw, if you are interested in test automation, but Rust is not particularly your cup of tea: I’ve compiled an entry-level TA tutorial with Python. Check it out!
Back in Summer 2019 we had a workweek full of tech talks and presentations, where we explored various topics from advanced DevOps practises to biometric engines. We had eeeverything. Of course testing-me had to live up to his urge and enrolled to all listed talks regarding his favorite IT-discipline: System Design Processes, Enterprise-Scale QA… and then there was that particular presentation about a simple yet effective test automation technique called fuzzing.
That one got me. I listened with an evil grin and decided to give it a shot. And that’s what we are going to do today!
Fuzzing – as explained in the talk – is a testing technique, that feeds the application a huge amount of random input data with different types and checks, which of them crashes the application. Simple enough. This can happen in a Black Box fashion by bombarding the public API or in a more White Box fashion by instrumenting the application code in order to get even more coverage and insides-related details.
In today’s tutorial, we will go through a Black Box Fuzzing setup written in Java. That’s because I’m more of a Black Box Testing person, and my main field of action is Java-based enterprise applications. More exactly, we will prepare a happy little Play Framework-based web application, that somehow got a commercial 3rd party conversion library called „Legacy“ imposed upon. Next we QAs want to have a first glance at Legacy’s state of quality to see, whether the purchase was at least somewhat worth it.
Prerequisites
This tutorial assumes that you have sbt and Maven installed. Since I wanted to try the Play Framework as a nice little side learning, we have to get along with sbt, but don’t worry: We need it only to compile the app. If you are curious, you can use it to run the app, too, but that’s 100% optional.
Maven on the other hand is used to operate the fuzz tests and thus will be our bread and butter tool.
Our Setup
Here’s the link to Happy Little Webapp’s source code repository. In ./app you can find the code of our Legacy-Module next to the web app’s controllers and (unused) views. Technically it’s not a blackbox, since I had to write the example code by myself, but let’s assume, we as the testers don’t know anything about it’s details, except for the public methods‘ signatures.
First, open the sbt shell: In your terminal of choice, enter the command sbt. Next, in the sbt-shell we just opened, we enter compile to compile the app’s code. Afterwards, if you are curious about what the app actually does, you can type run to start it. Now you can perform a request in your browser like:
It should display 53.36. Not as correct as we would expect it to be, because the used factor for the calculation is static and likely outdated. But for testing purposes, let’s assume, it is sufficient.
Next, we take care of our fuzz tests located in ./fuzztests. The pom.xml already knows about their location, so by using it, we can execute the tests right away. The fuzzing will be executed with a maven plugin called jqf-fuzz. Please see its github repository for the code and its well-elaborated documentation. With all that coming together, we are ready to fuzz.
Get the fuzzing started
First, we have to install the jqf-fuzz Maven plugin by doing a simple:
mvn clean test-compile
This downloads the jqf-fuzz plugin to our local maven repository and compiles the test sources. Now we have access to 2 new maven goals: jqf:fuzz executes the fuzz tests, and jqf:repro replays failed test cases to hunt down associated defects. Both goals expect several input parameter defined by JVM parameters (-D on the CLI) and/or by definition within the POM. This allows for a rich set of customization, that is both user- and CI-friendly. For demonstration purposes, I already configured the parameter time in the POM so that the test runs for 10 seconds, that still provides us with lots of input. Further, I predefined the fuzz test class to be executed. Therefore, the only parameter we must provide from the terminal is our test method -Dmethod=dollar2euro. We will do that in a minute, but first let’s have a look at the fuzz test class.
Let’s run the test
This is what we gonna unleash upon our web app:
@RunWith(JQF.class)
public class LegacyConverterFuzzer {

private static LegacyConverter legacyConverter;

@BeforeClass
public static void beforeClass(){
    legacyConverter = new LegacyConverter();
}

@Fuzz
public void dollar2euro(Object input){ // this is where the fun things happen
   try {
       System.out.println("Input: " + input.toString());
       System.out.println("Output: " + legacyConverter.dollar2euro(input));
   } catch (Throwable e) {
       System.out.println(e.getClass().getName() + ":" +
                          e.getMessage());
   }
}

[... some more Fuzz-Tests, please see the repository linked above...]
}
Legacy’s executives promised, that any input works fine. Okay! Then we perform the test dynamic-typed by using an Object-typed input parameter.
Alright, that’s the code. Let’s fire it up. On your terminal, please do:
mvn jqf:fuzz -Dmethod=dollar2euro
Here’s an excerpt from the results as seen in my terminal. The output will vary for each new test run, because, as we said earlier, the input values in fuzz tests are random.
java.lang.NumberFormatException: Character 텈 is neither a decimal digit number, decimal point, nor "e" notation exponential mark.
Input: edu.berkeley.cs.jqf.fuzz.junit.quickcheck.InputStreamGenerator$1@4fc3c165
java.lang.NumberFormatException: Too many nonzero exponent digits.
Input: 뤇皽
java.lang.NumberFormatException: Character 뤇 is neither a decimal digit number, decimal point, nor "e" notation exponential mark.
Input: ky
java.lang.NumberFormatException: Character k is neither a decimal digit number, decimal point, nor "e" notation exponential mark.
Input: FixedClock[+898773291-08-05T17:23:55.165612278Z,UTC]
java.lang.NumberFormatException: Character array is missing "e" notation exponential mark.
Input: -8475850143961316955
Output: -7797782132444411598.60
Input: bn
java.lang.NumberFormatException: Character b is neither a decimal digit number, decimal point, nor "e" notation exponential mark.
Input: 16:19:25.242056065Z
java.lang.NumberFormatException: Character array is missing "e" notation exponential mark.
Input: -895394919-05-23T23:50:04.780324820
java.lang.NumberFormatException: Character array is missing "e" notation exponential mark.
Input: 11:14:21.890848137Z
Phew! We got a lot of NumberFormatExceptions. So much about „any input works“. Our PO should know about that.
6 months full of arguments later, the supplier delivered API version v1.0.1 of his LegacyConverter ensuring a static-typed API. He changed dollar2euro to the following:
Of course, we have to adapt our controller, too. For playground reasons, we keep that change as simple as possible.
    public Result dollar2euro(String dollars) {
        return ok(importantConverter.dollar2euro(
                  BigDecimal.valueOf(Double.valueOf(dollars))));
    }
When we enter non-numeric inputs, the app will still fail, but at least it’s on us now.
Alright, the fixes are applied. Now in our test class, we see a sweet little type check error: We have to change the test method’s input parameter’s type accordingly to BigDecimal, too. This makes our fuzz test static-typed.
Afterwards, we recompile the tests and repeat the fuzz:
We have seen, how we can use fuzzing to create a vast storm of static or dynamic-typed test inputs and thus create hundreds of different test cases. From the output logs we can learn, what inputs can be handled by our application and – more interesting – what not. This provides us with an insightful first glance at the quality, a great starting point for further functional test cases, and, of course, with even more application bombing by using our favorite CI system.
From here, we can follow the functional testing track with even more elaborated automation or dive deeper into Java Fuzzing with the official JQF-Fuzz paper. And if you still need motivation to automate your tests, check out here why test automation is cool. Also there is a new tutorial about threads in Java fresh out of the oven. Enjoy it while it’s hot!
Last but not least a huge shoutout to the great people at X41 D-SEC, who held the exciting talk that inspired me and made me put fuzzing into my tool box.
Actually I wanted to wait for the Acclaim Badge to be issued, but it seems it takes a while. Therefore, here’s the announcement. Once I get the badge, you can find it on my business profiles page.
What did i get out of it?
Ok, enough about myself. The much more important question is: What will I bring back to the company? Within the lessons, I identified two big points to improve on:
Measure a lot more
Before the learning kicked in, my measurement revolved mainly around basic requirements coverage to see, when we are „done“. Since back then I always had the feeling, that it’s not enough. There is much much more to our apps, the quality and the project team than the mere requirements coverage or the backlog burndown charts. Now I am sure that I urgently have to improve on my measures and thus transparency.
Getting involved in risk analysis
I joined the party project quite late, and therefore missed out a lot of the fun that happened at the beginning. Furthermore, since risk management is supposed to be done continuously, I’d like to perform internal risk analysis sessions with my project team. Here I want to give the team a platform, where we can address possible problems in a structured way. The result will be an insight-rich document, that we testers can feed upon in order to see, in which direction we should proceed. E.g. should we go more in-depth for bullet point A, or is there a point B, that is not handled at all?
Conclusion
Although I’m happy about having passed the exam, I am super thankful for the lessons learned, too. I discovered important improvement points, gained a big load of new knowledge and valuable insights. This means a lot to me and I’m sure, that it will help me becoming a better professional in the short and in the long run.
Last week I held a short & sweet presentation in the company about the usage, benefits and drawbacks of Browser Remote Debugging APIs. One unfortunate problem we discovered was the lack of a standard across the browsers; every major browser maintains its very own implementation. The RemoteDebug – Intitiative tried to solve this problem, but until now without noticeable success, as you can see here by the lack of activity. Therefore, the Test and Development – World needed to deal with that all by themselves. A great team of ex Puppeteer-developers, who moved from Google to Microsoft, did exactly that by bringing us Playwright, a framework for writing automated tests encapsulating and using the various Remote Debugging Interfaces. In today’s short example we write a quick example test with Playwright.
Installing Playwright
As a starting prerequisite, we need a NodeJS-Distribution with Version 10 or greater. Next, we go to our already well-filled project directory and create a new NodeJS-Project:
$ cd /path/to/your/project/directory
$ mkdir playwright_test && cd playwright_test
$ npm init
$ npm install --save-dev playwright
While the installation progresses, you will notice that Playwright brings its own browser binaries. Don’t worry about that, they are still perfectly valid, as the rendering engines are not modified at all. Only the debugging capabilities have been given a few extensions.
Alright, that’s all we need.
Time to dive into the code!
Let’s assume we want to buy red shoes on Amazon, because we need new shoes, and red is a nice color.
// 1. We start by initializing and launching a non-headless Firefox
// for demo purposes.
// (How do you call them, "headful"? "headded"? Feel free to drop me
// your best shots. :))
const {firefox} = require("playwright");

(async () => {
  const browser = await firefox.launch({headless: false, slowMo: 50});
  const context = await browser.newContext();

  // 2. Next, we head to the Amazon Landing Page...
  const page = await context.newPage();
  await page.goto("https://www.amazon.com");

  // 3. ...do the search for Red Shoes...
  await page.fill("#twotabsearchtextbox", "Red Shoes");
  const searchBox = await page.$("#twotabsearchtextbox");
  await searchBox.press("Enter");

  // 4. ...and take a nice deep look at the page
  // by saving a screenshot.
  await page.waitFor("img[data-image-latency='s-product-image']");
  await page.screenshot({path: "./screenshot.jpg", type: "jpeg"});

  // 5. Afterwards, we leave the testrun with a clean state.
  await browser.close();
})();
That’s it for now. From here, we can extend the test by doing elaborate verification steps, check out a nice pair of red shoes and pay them with our hard-earned testing money. Feel free to check out the example’s full source code from here and go ham.
Conclusion
With Playwright we got a means to write automated tests with ease against the many different Remote Debugging APIs. It copes nicely with the API differences while preserving an intuitive and familiar JS test automation syntax.
So if you are looking for a more lightweight and lower level alternative to Selenium, give it a go!
Zalenium, brought to us by German online fashion retailer Zalando, is a feature-enriched Selenium test platform based on the popular Selenium Grid. Besides the core features like scaling Selenium test execution nodes, it provides nice things like video recording, a video player directly in the management UI and integrations with popular browser test tools like Sauce Labs. For a more detailed overview, please check out the project page. As far as we are concerned here, we have all the good arguments we need to fire up a small test setup. 🙂
What are we going to do?
In the following miniworkshop, we temporarily slip into the shoes of a devops engineer and set up a minimal Zalenium Grid – environment in order to execute remote Selenium tests there. The goal is that we use no more than 2 files (of resonable size):
the docker-compose-file to build and start the Zalenium-container provided by Zalenium
a sample selenium-webdriver-test to be executed inside Zalenium, kindly provided by Felipe Almeida, thank you very much.
For our experiment, I modified the latter to enable remote driver execution instead of starting a local firefox. Therefore, I prepared everything in a small bitbucket-repo.
Prereqs for the Zalenium Setup
a recent version of Docker (should already include docker-compose)
Unfortunately, my Firefox (v67.0.4) does not support the video format of the test execution recordings. 🙁
Steps
Open a terminal and clone the repo.
cd inside the new directory and fire up the containers: $ docker-compose up -d
Start the test: $ ruby selenium_minimal.rb
After the test execution, open a Chromeand head to the Dashboard: http://localhost:4444/dashboard/
You should see one test execution in the list on the left side. Click it.
Play the video and enjoy the action of your test.
Conclusion
Now that you have the power to quickly fire up Zalenium and its grid nodes, you can go further. Host it on a remote machine serving your needs as a Test Automaton Engine, move it to the cloud and go to town. This should step up your Quality Assurance Game in a scalable and easily maintainable way. Have fun!
Diese Website verwendet Cookies, damit wir dir die bestmögliche Benutzererfahrung bieten können. Cookie-Informationen werden in deinem Browser gespeichert und führen Funktionen aus, wie das Wiedererkennen von dir, wenn du auf unsere Website zurückkehrst, und hilft unserem Team zu verstehen, welche Abschnitte der Website für dich am interessantesten und nützlichsten sind.
Unbedingt notwendige Cookies
Unbedingt notwendige Cookies sollten jederzeit aktiviert sein, damit wir deine Einstellungen für die Cookie-Einstellungen speichern können.
Wenn du diesen Cookie deaktivierst, können wir die Einstellungen nicht speichern. Dies bedeutet, dass du jedes Mal, wenn du diese Website besuchst, die Cookies erneut aktivieren oder deaktivieren musst.