
cucumber-rust has had a long way, since my last post about the 0.7 release in October 2020. It’s time to come back and see what happened since back then. First of all, starting from the initial 0.8.0 release, I will dig through the changelog and evaluate my favorite changes. Then we will update the Cucumber tests of my encrspyter project to the most recent version. Lots of stuff to do, so let’s go!
New things first
Let’s start soft: With 0.8.4, we got a --debug command line flag that leverages the test execution to nicely print stdout and stderr for each executed step. We can activate the debug mode in the runner creation code of our test’s main function:
fn main() {
    let runner = cucumber::Cucumber::<EncrsypterTestWorld>::new()
        .features(&["./tests/features/"])
        .steps(encrypt_decrypt_steps::steps())
        .debug(true); // This activates the new debug mode
    ...
}
By running cargo test, we can see it in action:
Neat, right?
t!-Macro extended with a World parameter type
Tiny but neat addition: We can now add the type of our Cukes World-object to the t!-closure.
t!(|mut world: MyPersonalCukesWorld, ctx| { [...] }Although the generated code is the same as without the explicit type, it adds a bit more Rust-style expressivity. Sweet!
New callback methods for the Cucumber runner: before and after
In vanilla Cucumber, I admired its feature to define hooks that intercept the execution of a feature or a scenario. You can write some code and tell Cucumber to execute it before, after or before and after a scenario, feature or even a step. This is useful to for example set up or tear down a test database before or respectively after a test run.
With the release of 0.9.0, we can do similar things in Rust, too. There is a significant implementation difference to vanilla Cukes though: Our hooks won’t be picked up from wherever they are defined, but are defined as properties of the Cucumber runner instead. To compensate, our before and after hooks come with powerful query options to decide where to execute the defined method.
The second difference is that they are not officially called „hooks“ but „lifecycle methods“ instead. I might get this wrong due to habits. Please bear with me.
Lets head into an example. Given 2 features, one of them in English, one of them in German, each in 2 separate files:
# Feature 1 (English description)
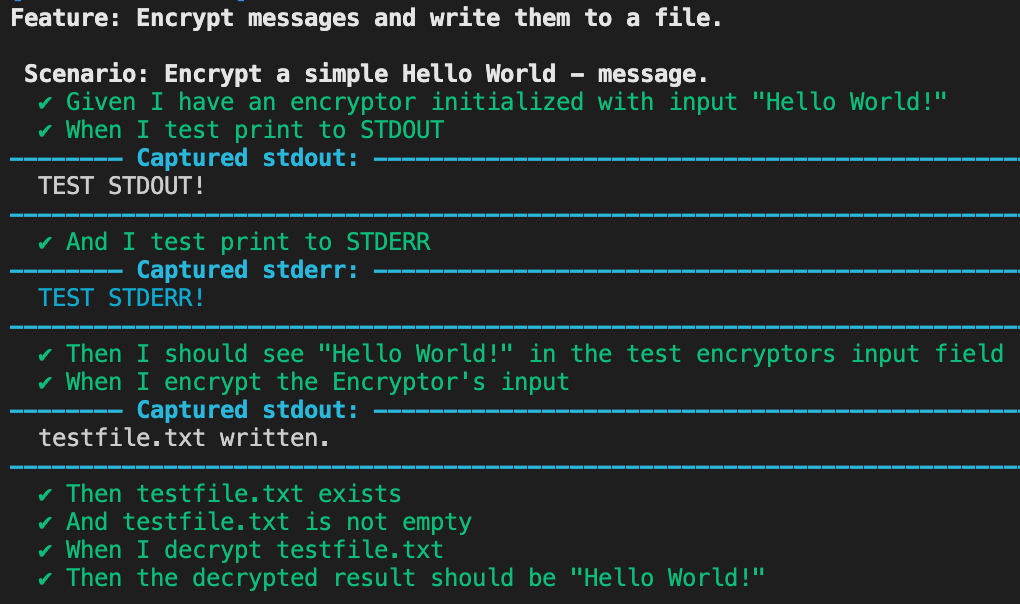
Feature: Encrypt messages and write them to a file.
Scenario: Encrypt a simple Hello World - message.
Given I have an encryptor initialized with input "Hello World!"
When I test print to STDOUT
And I test print to STDERR
Then I should see "Hello World!" in the test encryptor's input field
When I encrypt the encryptor's input
Then testfile.txt exists
And testfile.txt is not empty
When I decrypt testfile.txt
Then the decrypted result should be "Hello World!"
# language: de
# Feature 1 (German description)
Funktionalität: Verschlüssele Nachrichten und schreibe sie in eine Datei.

  Beispiel: Encrypt a simple Hello World - message.
    Angenommen I have an encryptor initialized with input "Hello World!"
     Wenn I test print to STDOUT
      Und I test print to STDERR
     Dann I should see "Hello World!" in the test encryptor's input field
     Wenn I encrypt the encryptor's input
     Dann testfile.txt exists
      Und testfile.txt is not empty
     Wenn I decrypt testfile.txt
     Dann the decrypted result should be "Hello World!"
What we want to do now is get greeted and dismissed in the respective language. We will define proper lifecycle methods on our Cucumber runner to do that. In the main method:
    let english_feature_name = "Encrypt messages and write them to a file."; // full string filter for the English...
    let german_feature_pattern = Regex::new("Verschlüssele Nachrichten.*").unwrap(); // and a Regex filter for the German variant.

let runner = cucumber::Cucumber::<world::EncrsypterTestWorld>::new()
.features(&["./tests/features/"])
        .steps(crate::encrypt_decrypt_steps::steps())
        .language("de")
        .before(feature(english_feature_name), |_ctx| {
            async { println!("Greetings, encryptor!") }.boxed()
        })
        .after(feature(english_feature_name), |_ctx| {
            async { println!("Goodbye, encryptor!") }.boxed()
        })
        .before(feature(german_feature_pattern.clone()), |_ctx| { // clone is necessary here due to the trait bounds of Inner<Pattern>
            async { println!("Hallo, Verschlüsselnder.") }.boxed()
        })
        .after(feature(german_feature_pattern), |_ctx| {
            async { println!("Tschüss, Verschlüsselnder.") }.boxed()
        });
feature() expects either the full feature description as a &str or a valid regex::Regex() matching your targets‘ description string. The latter requires the regex module as a dependency in your Cargo.toml, but it will provide you a highly powerful filtering tool, so adding that additional dependency is highly recommended.
Executing cargo test will show us what we expect. For the English feature file:
Greetings, encryptor!
Feature: Encrypt messages and write them to a file.

[...]

  ✔ Then the decrypted result should be "Hello World!"
Goodbye, encryptor!
For the German Feature file:
Hallo, Verschlüsselnder.
Funktionalität: Verschlüssele Nachrichten und schreibe sie in eine Datei.

[...]

  ✔ Dann the decrypted result should be "Hello World!"
Tschüss, Verschlüsselnder.
Great stuff! Last but not least, let me note that this does not only work with Feature, but with Scenario and Rule, too. You can even create more custom filters by combining them with And and Or. Please refer to the cucumber-rust code base for more about that.
Heads up, a breaking change!
With 0.9.0 we got one significant change in Cukes‘ public API, but don’t worry: Fixing it is quickly done and even quite easily automatable. If you review my guide on cucumber-rust for 0.7, you will see the related step definitions written like this:
.given_regex_async(
    r#"^I have an encryptor initialized with input "([\w\s!]+)"$"#,
    t!(|mut world, texts_to_encrypt, _step| {
        world.encryptor.input = Cow::Owned(texts_to_encrypt[1].to_owned());
        world
    }),
)
This throws a compiler error now stating that the „signature“ of the t! macro has changed: Instead of the regex matches object in parameter #2 and _step in parameter #3, we now have a single StepContext object that contains the properties matches and step.
Therefore, in the above example we have to do the following:
- Remove the _step parameter entirely
- Rename our matches parameter
texts_to_encryptto something that reflects theStepContexttype:ctx - Replace the occurrences of
texts_to_encryptwithctx.matches[index_used_previously]
For _step we have no replacements to do, because we didn’t use it in the first place, so that’s basically it. The runnable step definition should now look like this:
.given_regex_async(r#"^I have an encryptor initialized with input "([\w\s!]+)"$"#, t!(|mut world, ctx| {
                world.encryptor.input = Cow::Owned(ctx.matches[1].to_owned());
                world
    }),
)
Personally I like this particular change quite a lot, because it keeps the already loaded t! macro clean and organised. What do you think? Feel free to let me know in the comments below.
Feature: Addbeforeandafterlifecycle functions to the Cucumber builder. This function takes a selector for determining when to run 'before' or 'after', and a callback Feature: add language argument to Cucumber builder to set default language for all feature files (ON HOLD)
Encrsypter’s Cucumber tests in a new look
I updated the tests in Encrsypter’s project master and in the cukes_0.9.0 branch, so if you want to see the changes in full action, give it a git pull on the master or a git checkout on the mentioned branch and enjoy.
Conclusion: great changes and improvements
Phew, so long. cucumber-rust really does have a long way, and many things have changed for more Cukes excitement. Personally I like the current implementation state really a lot and I’m looking forward to seeing its bright future. But for now, let’s wrap up the wrapup, shall we?
If you want to read more about Cukes in Rust, here’s my intro to Cucumber in Rust written for 0.7. Or you might say „meh, I prefer the vintage things of life, give me the vanilla stuff“. In that case, here you can find the original version of my intro guide.
And last but for sure not least, here’s the project’s full changelog with all the goodness listed. Happy cuking!