When you are using downstream pipelines in Gitlab CI for complex Maven Projects as I do, you may have stumbled accross this error at least once: Cannot create local repository at: /.m2/repository. The Gitlab runner tries to create a local Maven repository at /.m2/repository – so in the topmost directory – and fails horribly due to an obvious lack of permissions. Let‘ see what happens here.
The Gitlab CI Setup
In my case I had a shell-based Gitlab runner that executes a test suite based on a few artifacts published by a Docker runner. Due to versioning and system test level realism reasons I was not able to use the artifacts directly. Unfortunate, but it shouldn’t pose that kind of a problem, does it?
Now when it comes to cloning the test suite on my shell runner, this cryptic error has been dropped. And naturally I was like „WTF is this runner trying to do!?“
The root cause in Gitlab CI downstream jobs
What I was not aware of is that per default the „child job“ inherits all the custom and Gitlab-provided runner variables from the triggering parent job that is still executed on a Docker runner. Now since the trigger happens from a Docker runner job, the variables my child job receives are poison for a baremetal environment that is my shell runner. Not least because things actually do happen at / in a Docker-based Gitlab execution environment, which is perfectly fine, but not on a shell runner.
The solution: What I had to do to make the CI jobs work
To fix the problem I had to set this on my trigger job definition:
inherit:
  variables: false
This did not just fix the error for me, but it also made perfect sense. Due to the different execution environments – shell vs. docker and project A vs. project B – I have a different set of requirements for my Gitlab CI test job. Therefore we have another case of an error leading to better software design. In addition I learned another piece of Gitlab’s sometimes quite obscure default settings.
Conclusion
I hope this helps you during your day to day journey through the jungle that are Gitlab CI downstream jobs. As I’m an avid QA engineer, so if you want to read more about writing actual automated tests. Also I take care of deeper coding basics like working with threads in java. If you’d rather want to read up about Gitlab CI’s inherit keyword, here’s the link to the relevant section of the official Gitlab CI documentation. Feel free to have a look!
cucumber-rust has had a long way, since my last post about the 0.7 release in October 2020. It’s time to come back and see what happened since back then. First of all, starting from the initial 0.8.0 release, I will dig through the changelog and evaluate my favorite changes. Then we will update the Cucumber tests of my encrspyter project to the most recent version. Lots of stuff to do, so let’s go!
New things first
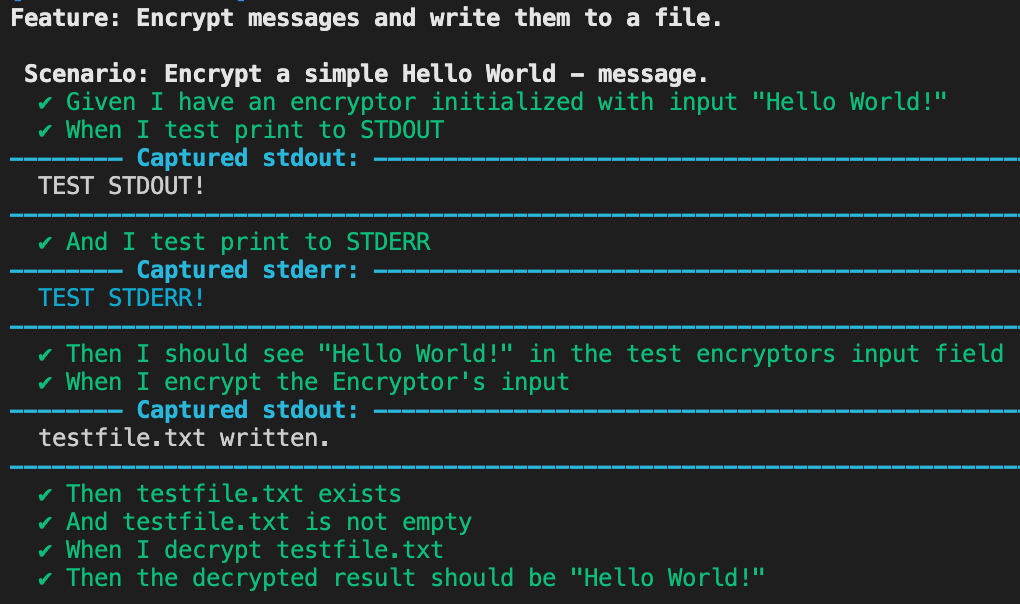
Let’s start soft: With 0.8.4, we got a --debug command line flag that leverages the test execution to nicely print stdout and stderr for each executed step. We can activate the debug mode in the runner creation code of our test’s main function:
fn main() {
    let runner = cucumber::Cucumber::<EncrsypterTestWorld>::new()
        .features(&["./tests/features/"])
        .steps(encrypt_decrypt_steps::steps())
        .debug(true); // This activates the new debug mode
    ...
}
By running cargo test, we can see it in action:
Neat, right?
t!-Macro extended with a World parameter type
Tiny but neat addition: We can now add the type of our Cukes World-object to the t!-closure.
Although the generated code is the same as without the explicit type, it adds a bit more Rust-style expressivity. Sweet!
New callback methods for the Cucumber runner: before and after
In vanilla Cucumber, I admired its feature to define hooks that intercept the execution of a feature or a scenario. You can write some code and tell Cucumber to execute it before, after or before and after a scenario, feature or even a step. This is useful to for example set up or tear down a test database before or respectively after a test run.
With the release of 0.9.0, we can do similar things in Rust, too. There is a significant implementation difference to vanilla Cukes though: Our hooks won’t be picked up from wherever they are defined, but are defined as properties of the Cucumber runner instead. To compensate, our before and after hooks come with powerful query options to decide where to execute the defined method.
The second difference is that they are not officially called „hooks“ but „lifecycle methods“ instead. I might get this wrong due to habits. Please bear with me.
Lets head into an example. Given 2 features, one of them in English, one of them in German, each in 2 separate files:
# Feature 1 (English description)
Feature: Encrypt messages and write them to a file.

  Scenario: Encrypt a simple Hello World - message.
    Given I have an encryptor initialized with input "Hello World!"
     When I test print to STDOUT
      And I test print to STDERR
     Then I should see "Hello World!" in the test encryptor's input field
     When I encrypt the encryptor's input
     Then testfile.txt exists
      And testfile.txt is not empty
     When I decrypt testfile.txt
     Then the decrypted result should be "Hello World!"
# language: de
# Feature 1 (German description)
Funktionalität: Verschlüssele Nachrichten und schreibe sie in eine Datei.

  Beispiel: Encrypt a simple Hello World - message.
    Angenommen I have an encryptor initialized with input "Hello World!"
     Wenn I test print to STDOUT
      Und I test print to STDERR
     Dann I should see "Hello World!" in the test encryptor's input field
     Wenn I encrypt the encryptor's input
     Dann testfile.txt exists
      Und testfile.txt is not empty
     Wenn I decrypt testfile.txt
     Dann the decrypted result should be "Hello World!"
What we want to do now is get greeted and dismissed in the respective language. We will define proper lifecycle methods on our Cucumber runner to do that. In the main method:
    let english_feature_name = "Encrypt messages and write them to a file."; // full string filter for the English...
    let german_feature_pattern = Regex::new("Verschlüssele Nachrichten.*").unwrap(); // and a Regex filter for the German variant.

let runner = cucumber::Cucumber::<world::EncrsypterTestWorld>::new()
.features(&["./tests/features/"])
        .steps(crate::encrypt_decrypt_steps::steps())
        .language("de")
        .before(feature(english_feature_name), |_ctx| {
            async { println!("Greetings, encryptor!") }.boxed()
        })
        .after(feature(english_feature_name), |_ctx| {
            async { println!("Goodbye, encryptor!") }.boxed()
        })
        .before(feature(german_feature_pattern.clone()), |_ctx| { // clone is necessary here due to the trait bounds of Inner<Pattern>
            async { println!("Hallo, Verschlüsselnder.") }.boxed()
        })
        .after(feature(german_feature_pattern), |_ctx| {
            async { println!("Tschüss, Verschlüsselnder.") }.boxed()
        });
feature() expects either the full feature description as a &str or a valid regex::Regex() matching your targets‘ description string. The latter requires the regex module as a dependency in your Cargo.toml, but it will provide you a highly powerful filtering tool, so adding that additional dependency is highly recommended.
Executing cargo test will show us what we expect. For the English feature file:
Greetings, encryptor!
Feature: Encrypt messages and write them to a file.

[...]

  ✔ Then the decrypted result should be "Hello World!"
Goodbye, encryptor!
For the German Feature file:
Hallo, Verschlüsselnder.
Funktionalität: Verschlüssele Nachrichten und schreibe sie in eine Datei.

[...]

  ✔ Dann the decrypted result should be "Hello World!"
Tschüss, Verschlüsselnder.
Great stuff! Last but not least, let me note that this does not only work with Feature, but with Scenario and Rule, too. You can even create more custom filters by combining them with And and Or. Please refer to the cucumber-rust code base for more about that.
Heads up, a breaking change!
With 0.9.0 we got one significant change in Cukes‘ public API, but don’t worry: Fixing it is quickly done and even quite easily automatable. If you review my guide on cucumber-rust for 0.7, you will see the related step definitions written like this:
.given_regex_async(
    r#"^I have an encryptor initialized with input "([\w\s!]+)"$"#,
    t!(|mut world, texts_to_encrypt, _step| {
        world.encryptor.input = Cow::Owned(texts_to_encrypt[1].to_owned());
        world
    }),
)
This throws a compiler error now stating that the „signature“ of the t! macro has changed: Instead of the regex matches object in parameter #2 and _step in parameter #3, we now have a single StepContext object that contains the properties matches and step.
Therefore, in the above example we have to do the following:
Remove the _step parameter entirely
Rename our matches parameter texts_to_encrypt to something that reflects the StepContext type: ctx
Replace the occurrences of texts_to_encrypt with ctx.matches[index_used_previously]
For _step we have no replacements to do, because we didn’t use it in the first place, so that’s basically it. The runnable step definition should now look like this:
.given_regex_async(r#"^I have an encryptor initialized with input "([\w\s!]+)"$"#, t!(|mut world, ctx| {
                world.encryptor.input = Cow::Owned(ctx.matches[1].to_owned());
                world
    }),
)
Personally I like this particular change quite a lot, because it keeps the already loaded t! macro clean and organised. What do you think? Feel free to let me know in the comments below.
Feature: Add before and after lifecycle functions to the Cucumber builder. This function takes a selector for determining when to run 'before' or 'after', and a callback

Feature: add language argument to Cucumber builder to set default language for all feature files (ON HOLD)
Encrsypter’s Cucumber tests in a new look
I updated the tests in Encrsypter’s project master and in the cukes_0.9.0 branch, so if you want to see the changes in full action, give it a git pull on the master or a git checkout on the mentioned branch and enjoy.
Conclusion: great changes and improvements
Phew, so long. cucumber-rust really does have a long way, and many things have changed for more Cukes excitement. Personally I like the current implementation state really a lot and I’m looking forward to seeing its bright future. But for now, let’s wrap up the wrapup, shall we?
If you want to read more about Cukes in Rust, here’s my intro to Cucumber in Rust written for 0.7. Or you might say „meh, I prefer the vintage things of life, give me the vanilla stuff“. In that case, here you can find the original version of my intro guide. And last but for sure not least, here’s the project’s full changelog with all the goodness listed. Happy cuking!
Back in Summer 2019 we had a workweek full of tech talks and presentations, where we explored various topics from advanced DevOps practises to biometric engines. We had eeeverything. Of course testing-me had to live up to his urge and enrolled to all listed talks regarding his favorite IT-discipline: System Design Processes, Enterprise-Scale QA… and then there was that particular presentation about a simple yet effective test automation technique called fuzzing.
That one got me. I listened with an evil grin and decided to give it a shot. And that’s what we are going to do today!
Fuzzing – as explained in the talk – is a testing technique, that feeds the application a huge amount of random input data with different types and checks, which of them crashes the application. Simple enough. This can happen in a Black Box fashion by bombarding the public API or in a more White Box fashion by instrumenting the application code in order to get even more coverage and insides-related details.
In today’s tutorial, we will go through a Black Box Fuzzing setup written in Java. That’s because I’m more of a Black Box Testing person, and my main field of action is Java-based enterprise applications. More exactly, we will prepare a happy little Play Framework-based web application, that somehow got a commercial 3rd party conversion library called „Legacy“ imposed upon. Next we QAs want to have a first glance at Legacy’s state of quality to see, whether the purchase was at least somewhat worth it.
Prerequisites
This tutorial assumes that you have sbt and Maven installed. Since I wanted to try the Play Framework as a nice little side learning, we have to get along with sbt, but don’t worry: We need it only to compile the app. If you are curious, you can use it to run the app, too, but that’s 100% optional.
Maven on the other hand is used to operate the fuzz tests and thus will be our bread and butter tool.
Our Setup
Here’s the link to Happy Little Webapp’s source code repository. In ./app you can find the code of our Legacy-Module next to the web app’s controllers and (unused) views. Technically it’s not a blackbox, since I had to write the example code by myself, but let’s assume, we as the testers don’t know anything about it’s details, except for the public methods‘ signatures.
First, open the sbt shell: In your terminal of choice, enter the command sbt. Next, in the sbt-shell we just opened, we enter compile to compile the app’s code. Afterwards, if you are curious about what the app actually does, you can type run to start it. Now you can perform a request in your browser like:
It should display 53.36. Not as correct as we would expect it to be, because the used factor for the calculation is static and likely outdated. But for testing purposes, let’s assume, it is sufficient.
Next, we take care of our fuzz tests located in ./fuzztests. The pom.xml already knows about their location, so by using it, we can execute the tests right away. The fuzzing will be executed with a maven plugin called jqf-fuzz. Please see its github repository for the code and its well-elaborated documentation. With all that coming together, we are ready to fuzz.
Get the fuzzing started
First, we have to install the jqf-fuzz Maven plugin by doing a simple:
mvn clean test-compile
This downloads the jqf-fuzz plugin to our local maven repository and compiles the test sources. Now we have access to 2 new maven goals: jqf:fuzz executes the fuzz tests, and jqf:repro replays failed test cases to hunt down associated defects. Both goals expect several input parameter defined by JVM parameters (-D on the CLI) and/or by definition within the POM. This allows for a rich set of customization, that is both user- and CI-friendly. For demonstration purposes, I already configured the parameter time in the POM so that the test runs for 10 seconds, that still provides us with lots of input. Further, I predefined the fuzz test class to be executed. Therefore, the only parameter we must provide from the terminal is our test method -Dmethod=dollar2euro. We will do that in a minute, but first let’s have a look at the fuzz test class.
Let’s run the test
This is what we gonna unleash upon our web app:
@RunWith(JQF.class)
public class LegacyConverterFuzzer {

private static LegacyConverter legacyConverter;

@BeforeClass
public static void beforeClass(){
    legacyConverter = new LegacyConverter();
}

@Fuzz
public void dollar2euro(Object input){ // this is where the fun things happen
   try {
       System.out.println("Input: " + input.toString());
       System.out.println("Output: " + legacyConverter.dollar2euro(input));
   } catch (Throwable e) {
       System.out.println(e.getClass().getName() + ":" +
                          e.getMessage());
   }
}

[... some more Fuzz-Tests, please see the repository linked above...]
}
Legacy’s executives promised, that any input works fine. Okay! Then we perform the test dynamic-typed by using an Object-typed input parameter.
Alright, that’s the code. Let’s fire it up. On your terminal, please do:
mvn jqf:fuzz -Dmethod=dollar2euro
Here’s an excerpt from the results as seen in my terminal. The output will vary for each new test run, because, as we said earlier, the input values in fuzz tests are random.
java.lang.NumberFormatException: Character 텈 is neither a decimal digit number, decimal point, nor "e" notation exponential mark.
Input: edu.berkeley.cs.jqf.fuzz.junit.quickcheck.InputStreamGenerator$1@4fc3c165
java.lang.NumberFormatException: Too many nonzero exponent digits.
Input: 뤇皽
java.lang.NumberFormatException: Character 뤇 is neither a decimal digit number, decimal point, nor "e" notation exponential mark.
Input: ky
java.lang.NumberFormatException: Character k is neither a decimal digit number, decimal point, nor "e" notation exponential mark.
Input: FixedClock[+898773291-08-05T17:23:55.165612278Z,UTC]
java.lang.NumberFormatException: Character array is missing "e" notation exponential mark.
Input: -8475850143961316955
Output: -7797782132444411598.60
Input: bn
java.lang.NumberFormatException: Character b is neither a decimal digit number, decimal point, nor "e" notation exponential mark.
Input: 16:19:25.242056065Z
java.lang.NumberFormatException: Character array is missing "e" notation exponential mark.
Input: -895394919-05-23T23:50:04.780324820
java.lang.NumberFormatException: Character array is missing "e" notation exponential mark.
Input: 11:14:21.890848137Z
Phew! We got a lot of NumberFormatExceptions. So much about „any input works“. Our PO should know about that.
6 months full of arguments later, the supplier delivered API version v1.0.1 of his LegacyConverter ensuring a static-typed API. He changed dollar2euro to the following:
Of course, we have to adapt our controller, too. For playground reasons, we keep that change as simple as possible.
    public Result dollar2euro(String dollars) {
        return ok(importantConverter.dollar2euro(
                  BigDecimal.valueOf(Double.valueOf(dollars))));
    }
When we enter non-numeric inputs, the app will still fail, but at least it’s on us now.
Alright, the fixes are applied. Now in our test class, we see a sweet little type check error: We have to change the test method’s input parameter’s type accordingly to BigDecimal, too. This makes our fuzz test static-typed.
Afterwards, we recompile the tests and repeat the fuzz:
We have seen, how we can use fuzzing to create a vast storm of static or dynamic-typed test inputs and thus create hundreds of different test cases. From the output logs we can learn, what inputs can be handled by our application and – more interesting – what not. This provides us with an insightful first glance at the quality, a great starting point for further functional test cases, and, of course, with even more application bombing by using our favorite CI system.
From here, we can follow the functional testing track with even more elaborated automation or dive deeper into Java Fuzzing with the official JQF-Fuzz paper. And if you still need motivation to automate your tests, check out here why test automation is cool. Also there is a new tutorial about threads in Java fresh out of the oven. Enjoy it while it’s hot!
Last but not least a huge shoutout to the great people at X41 D-SEC, who held the exciting talk that inspired me and made me put fuzzing into my tool box.
Last week I held a short & sweet presentation in the company about the usage, benefits and drawbacks of Browser Remote Debugging APIs. One unfortunate problem we discovered was the lack of a standard across the browsers; every major browser maintains its very own implementation. The RemoteDebug – Intitiative tried to solve this problem, but until now without noticeable success, as you can see here by the lack of activity. Therefore, the Test and Development – World needed to deal with that all by themselves. A great team of ex Puppeteer-developers, who moved from Google to Microsoft, did exactly that by bringing us Playwright, a framework for writing automated tests encapsulating and using the various Remote Debugging Interfaces. In today’s short example we write a quick example test with Playwright.
Installing Playwright
As a starting prerequisite, we need a NodeJS-Distribution with Version 10 or greater. Next, we go to our already well-filled project directory and create a new NodeJS-Project:
$ cd /path/to/your/project/directory
$ mkdir playwright_test && cd playwright_test
$ npm init
$ npm install --save-dev playwright
While the installation progresses, you will notice that Playwright brings its own browser binaries. Don’t worry about that, they are still perfectly valid, as the rendering engines are not modified at all. Only the debugging capabilities have been given a few extensions.
Alright, that’s all we need.
Time to dive into the code!
Let’s assume we want to buy red shoes on Amazon, because we need new shoes, and red is a nice color.
// 1. We start by initializing and launching a non-headless Firefox
// for demo purposes.
// (How do you call them, "headful"? "headded"? Feel free to drop me
// your best shots. :))
const {firefox} = require("playwright");

(async () => {
  const browser = await firefox.launch({headless: false, slowMo: 50});
  const context = await browser.newContext();

  // 2. Next, we head to the Amazon Landing Page...
  const page = await context.newPage();
  await page.goto("https://www.amazon.com");

  // 3. ...do the search for Red Shoes...
  await page.fill("#twotabsearchtextbox", "Red Shoes");
  const searchBox = await page.$("#twotabsearchtextbox");
  await searchBox.press("Enter");

  // 4. ...and take a nice deep look at the page
  // by saving a screenshot.
  await page.waitFor("img[data-image-latency='s-product-image']");
  await page.screenshot({path: "./screenshot.jpg", type: "jpeg"});

  // 5. Afterwards, we leave the testrun with a clean state.
  await browser.close();
})();
That’s it for now. From here, we can extend the test by doing elaborate verification steps, check out a nice pair of red shoes and pay them with our hard-earned testing money. Feel free to check out the example’s full source code from here and go ham.
Conclusion
With Playwright we got a means to write automated tests with ease against the many different Remote Debugging APIs. It copes nicely with the API differences while preserving an intuitive and familiar JS test automation syntax.
So if you are looking for a more lightweight and lower level alternative to Selenium, give it a go!
Zalenium, brought to us by German online fashion retailer Zalando, is a feature-enriched Selenium test platform based on the popular Selenium Grid. Besides the core features like scaling Selenium test execution nodes, it provides nice things like video recording, a video player directly in the management UI and integrations with popular browser test tools like Sauce Labs. For a more detailed overview, please check out the project page. As far as we are concerned here, we have all the good arguments we need to fire up a small test setup. 🙂
What are we going to do?
In the following miniworkshop, we temporarily slip into the shoes of a devops engineer and set up a minimal Zalenium Grid – environment in order to execute remote Selenium tests there. The goal is that we use no more than 2 files (of resonable size):
the docker-compose-file to build and start the Zalenium-container provided by Zalenium
a sample selenium-webdriver-test to be executed inside Zalenium, kindly provided by Felipe Almeida, thank you very much.
For our experiment, I modified the latter to enable remote driver execution instead of starting a local firefox. Therefore, I prepared everything in a small bitbucket-repo.
Prereqs for the Zalenium Setup
a recent version of Docker (should already include docker-compose)
Unfortunately, my Firefox (v67.0.4) does not support the video format of the test execution recordings. 🙁
Steps
Open a terminal and clone the repo.
cd inside the new directory and fire up the containers: $ docker-compose up -d
Start the test: $ ruby selenium_minimal.rb
After the test execution, open a Chromeand head to the Dashboard: http://localhost:4444/dashboard/
You should see one test execution in the list on the left side. Click it.
Play the video and enjoy the action of your test.
Conclusion
Now that you have the power to quickly fire up Zalenium and its grid nodes, you can go further. Host it on a remote machine serving your needs as a Test Automaton Engine, move it to the cloud and go to town. This should step up your Quality Assurance Game in a scalable and easily maintainable way. Have fun!
If you prefer your testautomation like i do – in Ruby within a version manager – then it is likely that you will eventually face the following situation in one or the other way:
Error running '__rvm_make - j4'
Please read [...]/make.log
There has been an error while running make.
Halting the installation.
A quick look into the mentioned make.log shows:
./miniruby: permission denied
In my case it happened, when i tried to conveniently install a Ruby from the 2.3 series using rvm:
rvm install 2.3.7
After a while full of painful investigation resulting in lots of „operation not permitted“, I decided to solve it in a pragmatic way: by using
rvm mount
The Solution: rvm mount
So what are we gonna do?
We will install Ruby from source to a custom directory first, and rvm mount it afterwards to make it available in RVM. We assume you have RVM installed already.
First we need to make sure, that we have all required external dependencies. Usually openssl and gdbm are sufficient. Do brew install openssl and brew install gdbm
Open a terminal and move into the extracted folder.
Do ./configure –with-gdbm-dir=“$(brew –prefix gdbm)“ –with-openssl-dir=“$(brew –prefix openssl)“ –prefix=RUBY_TARGET_DIR
We have to specify gdbm’s and openssl’s installation directory, because brew installed these keg-only on my machine. That means it is installed, but not symlinked to /usr/bin or /usr/local/bin.
RUBY_TARGET_DIR can be any custom directory you have free access to. I recommend smething like $HOME/rubies/<version key, e.g. 2.3.7/>
Do make and make install.
Now that we have our precious Ruby, where we want it to be, it is time to register it in RVM; do rvm mount /your/path/chosen/in/step4
When prompted, give it a nice name and proceed. Don’t wonder, it will get prefixed with ext-. This is normal.
Do rvm list and copy the name of your new Ruby.
Do rvm use <the copied name> as usual.
Check if your ruby is used correctly: Do ruby -v. It should display the expected ruby version.
Go ahead and have fun with your new Ruby.
Epilogue
Starting from here, you achieved not only a Ruby that works, but also the freedom to build and install your favorite programming language exactly the way you want without missing out the cool features of a Ruby version manager and without any sudo-hassle. Maybe this way is a nice alternative for our fellow rbenv – users, too..? If you have a question, a better solution or any remarks, feel free to leave a comment. Otherwise, have a great day & rock on!
The IT world flourishes and blooms superfast. New products and services pop up on a daily basis. We all know and work with these trends: while product managers want to ship new product features blazing fast, their fellow QA department invests time to „step back“ and make sure the shipping product increment does, what it is supposed to do. This of course creates a fragile balance in the release schedule. Now if we want to optimize the balance by applying upfront techniques like code reviews, TDD and test automation, the role of QA undergoes a slow but steady change. In my career, i saw a growing number of job offers in manual QA requiring more extensive technical knowledge. At least basic test automation skills and abilities to understand code are often required nowadays.
Following, I’d like to use my very first blog post to point out, why it is a good thing to have the mentioned technical skills in your QA career.
Almost 3 years ago, I joined the ranks of the QA as a Test Automation Engineer. Since then, I worked for many different projects & people in different roles. I met Lead Developers, testers and CTOs of various companies. One of my most notable projects was the Logistics Department of a major food delivery company, which has a huge impact on the business, and therefore a great demand for quality. The team consisted almost only of developers and one (part-time) product manager. The logistics monitoring tool the team built is based on Ruby on Rails; a huge advantage for me, because my test automation stack is based on Ruby & Cucumber, that fits neatly into Rails. With this setup in mind, lets dive into the real questions: how can technical proficiency help you increase quality?
1. Static Code Analysis & Code Reviews
Highly underestimated in the testing departments, CR-techniques bring quality on a detailed level to the desk. Static analysing tools like Codeclimate or Scrutinizer already automate a great share of the efforts and provide the development team and you with valuable metrics and advice. With code reviews, you can complement these valuable results even more. Usually a task for developers, you as a QA can bring a different, more destructive, perspective to code discussions. This way, you may discover additional potential issues or convention breaks, that the developers may have not seen. Most Git-Providers come with easy diff tools to reduce your effort making all these nice things very cheap.
2. The Glue between Dev, QA & Product
As a technical QA you have many different insights at your disposal. When it comes to typical discussions in every day’s sprint life, you are in close contact to the manual testers leveraging yourself to absorb everything from the product design side. Then you can transfer the knowledge back to Dev and, equally interesting, vice versa. You can estimate & answer relevant questions from multiple perspectives.
3. Openings for more
Tech enables you to deliver even more forms of quality. For one project, I coded Performance- and Stress Tests directly in the Rails app using ruby-jmeter and made them part of the Rake-Scripts. Rake is the conventional build system similar to Make for Ruby on Rails – Projects. This enabled me to execute them on demand and could even serve next to your automated functional texts in scheduled test execution environments. All that while they are managed directly in the project’s Git-Repo as the source code files they are. Another big opportunity is release management, where you can play a big role. As scheduled or on-commit test executions play a major role in answering the question „Can we deploy?“, you are able to actively shape the CI/CD flow directly with the CI/CD-Tool of your choice bringing you directly to the heart of the release process for a lot of companies.
Technical QA – hot or not?
If you feel a knack for the technology around you, and if you want to explore that nefarious destructive glare in your eyes, I absolutely recommend you to go for it. You have nothing to lose and lots of interesting opportunities to gain. I made the experience that the entry is pretty smooth, and the basic technologies around Selenium or Jenkins for example are well known, documented and supported. Therefore, dive into it and prepare for adventure. 🙂
Diese Website verwendet Cookies, damit wir dir die bestmögliche Benutzererfahrung bieten können. Cookie-Informationen werden in deinem Browser gespeichert und führen Funktionen aus, wie das Wiedererkennen von dir, wenn du auf unsere Website zurückkehrst, und hilft unserem Team zu verstehen, welche Abschnitte der Website für dich am interessantesten und nützlichsten sind.
Unbedingt notwendige Cookies
Unbedingt notwendige Cookies sollten jederzeit aktiviert sein, damit wir deine Einstellungen für die Cookie-Einstellungen speichern können.
Wenn du diesen Cookie deaktivierst, können wir die Einstellungen nicht speichern. Dies bedeutet, dass du jedes Mal, wenn du diese Website besuchst, die Cookies erneut aktivieren oder deaktivieren musst.